SQL query to get concurrent programs attach to a plsql package

The below given is the query to find Concurrent Programs being attached to a particular PL /SQL Package . The below query can be modified to search Concurrent Program based on additional conditions . Uncomment the condition and pass required parameters to get the desired search results

SQL Query: Get concurrent programs attach to a PL/SQL package

SELECT
PROG.CONCURRENT_PROGRAM_ID,
PROG.USER_CONCURRENT_PROGRAM_NAME,
PROG.CONCURRENT_PROGRAM_NAME ,
DECODE(EXE.EXECUTION_METHOD_CODE ,
 'I', 'PL/SQL'
,'P', 'Reports'
,'C', 'SQL Loader'
,'Q', 'SQL Plus'
,'K', 'Java'
,'H', 'OS executable'
,'B' , 'Req. Set Stage'
) EXECUTION_METHOD,
APPL.APPLICATION_NAME ,
PROG.DESCRIPTION ,
EXE.EXECUTABLE_NAME,
EXE.EXECUTION_FILE_NAME
FROM
FND_EXECUTABLES EXE,
FND_APPLICATION_TL APPL,
FND_CONCURRENT_PROGRAMS_VL PROG
WHERE PROG.APPLICATION_ID = APPL.APPLICATION_ID
AND EXE.EXECUTABLE_ID = PROG.EXECUTABLE_ID
AND EXE.EXECUTION_METHOD_CODE = 'I' 
--AND PROG.USER_CONCURRENT_PROGRAM_NAME LIKE '%<ENTER_CONCURRENT_PROGRAM_NAME%>' -- Replace with your Concurrent Program Name
AND EXE.EXECUTION_FILE_NAME LIKE '%<ENTER_PACKAGE_NAME%>' 
--AND APPL.APPLICATION_NAME LIKE '%<ENTER_APPLICATION_NAME%>' 

Oracle EBS R12 SQL Query to get all user responsibilities

The below given query provides the list of all the responsibilities attached to a user

SELECT FND_USER.USER_NAME,
       FND_USER.EMAIL_ADDRESS,
       FND_RESP_TL.RESPONSIBILITY_NAME, 
       FND_USER_RESP_GRP.START_DATE, 
       FND_USER_RESP_GRP.END_DATE       
FROM
        FND_USER FND_USER, 
        FND_USER_RESP_GROUPS_DIRECT FND_USER_RESP_GRP,
        FND_RESPONSIBILITY_TL FND_RESP_TL
WHERE FND_USER.USER_NAME = :USER_NAME
AND FND_USER_RESP_GRP.USER_ID = FND_USER.USER_ID
AND FND_USER_RESP_GRP.RESPONSIBILITY_ID = FND_RESP_TL.RESPONSIBILITY_ID
AND FND_RESP_TL.LANGUAGE = 'US'

SQL to get the User Name 
SELECT FND_USER.USER_NAME, FND_USER.* FROM FND_USER FND_USER
--WHERE USER_NAME = :user_name

Oracle EBS R12 AR Receipt status

In Oracle EBS R12 , Account Receivables (AR) Receipts could have the below given status during the AR transaction processing phase.

Oracle EBS R12 AR Receipt Approved Status

The status ‘APPROVED’ indicates that the receipt has been approved for automatic receipt creation. This status is only valid for automatic receipts.

Oracle EBS R12 AR Receipt Confirmed Status

The status ‘CONFIRMED’ indicates that the customer has approved the application of this receipt and their account balances have been updated within Receivables.
The status ‘CONFIRMED’ is only valid for automatic receipts.

Oracle EBS R12 AR Receipt Remitted Status

The status ‘REMITTED’ indicates that  the receipt has been remitted. The status ‘REMITTED’ is valid for both automatic and manually entered receipts.

Oracle EBS R12 AR Receipt Cleared Status

The status ‘CLEARED’ indicates that payment of this receipt was transferred to bank account and the bank statement has been reconciled within Receivables. The status ‘CLEARED’  is valid for both automatic and manually entered receipts

Oracle EBS R12 AR Receipt Reversed Status

The status ‘REVERSED’ indicates that receipt has been reversed. You can reverse a receipt when the customer stops payment on a receipt or could be a wrong entry    being     done manually.  if a receipt comes from an account with non-sufficient funds or if you want to re-enter and reapply it in Receivables , then Receipt needs to be ‘REVERSED’.

You can reverse cash receipts and miscellaneous transactions

Oracle EBS R12 AR SQL to get Customer Address

The blog provides the Oracle EBS R12 AR SQL to get to get Customer Address details 

SELECT          HCA.ACCOUNT_NUMBER          CUSTOMER_NUMBER,
                HP.PARTY_NAME               CUSTOMER_NAME,
                HPS.PARTY_SITE_NUMBER       CUST_SITE_NUMBER, 
                HL.ADDRESS1                 ADDRESS_LINE1,
                HL.ADDRESS2                 ADDRESS_LINE2, 
                HL.ADDRESS3                 ADDRESS_LINE3,
                HL.ADDRESS4                 ADDRESS_LINE4,
                HL.CITY                     CITY,
                HL.POSTAL_CODE              POSTAL_CODE,
                HL.STATE                    STATE,
                FND_TL.TERRITORY_SHORT_NAME COUNTRY,
                HCSUA1.LOCATION             BILL_TO_LOCATION,
                HCSUA2.LOCATION             SHIP_TO_LOCATION,
                HCASA1.ORG_ID               ORG_ID
FROM           
                HZ_CUST_ACCOUNTS HCA,
                HZ_CUST_ACCT_SITES_ALL HCASA1,
                HZ_CUST_SITE_USES_ALL HCSUA1,
                HZ_LOCATIONS HL,
                HZ_PARTIES HP,
                HZ_PARTY_SITES HPS,
                FND_TERRITORIES_TL FND_TL,
                HZ_CUST_ACCT_SITES_ALL HCASA2,
                HZ_CUST_SITE_USES_ALL HCSUA2
WHERE           HP.PARTY_ID = HPS.PARTY_ID(+)
AND             HP.PARTY_ID = HCA.PARTY_ID(+)
AND             HPS.LOCATION_ID = HL.LOCATION_ID
AND             HL.COUNTRY = FND_TL.TERRITORY_CODE
AND             HCASA1.PARTY_SITE_ID(+) = HPS.PARTY_SITE_ID
AND             HCASA2.PARTY_SITE_ID(+) = HPS.PARTY_SITE_ID
AND             HCSUA1.CUST_ACCT_SITE_ID(+) = HCASA1.CUST_ACCT_SITE_ID
AND             HCSUA2.CUST_ACCT_SITE_ID(+) = HCASA2.CUST_ACCT_SITE_ID
AND             HCASA1.ORG_ID(+) = FND_PROFILE.VALUE ('ORG_ID')
AND             HCASA2.ORG_ID(+) = FND_PROFILE.VALUE ('ORG_ID')
AND             HCSUA1.SITE_USE_CODE(+) = 'BILL_TO'
AND             HCSUA2.SITE_USE_CODE(+) = 'SHIP_TO'
AND             FND_TL.LANGUAGE = USERENV ('LANG')
--AND             HCA.ACCOUNT_NUMBER IN ('320454', '314146')
ORDER BY        HCA.ACCOUNT_NUMBER ;

No credential mapper entry found for password indirection

The Developers using Weblogic Server for Deployment might get the below given error

weblogic.common.ResourceException: java.security.PrivilegedActionException: weblogic.common.ResourceException: No credential mapper entry found for password indirection.

This sort of error comes when you have multiple data source connections defined and WebLogic Server validates the data source connection and tries to make entry in the jdbc.xml

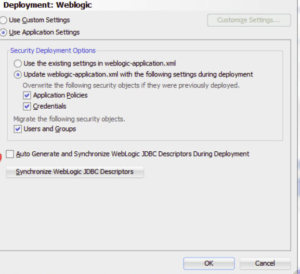
If we enable the option Auto Generate and synchronize weblogic-jdbc.xml descriptiors using deployment then weblogic server will try to read the file from the EAR getitng deployed and thus genereated the PrivilgedActionException in case of not getting proper values from the EAR file.

No credential mapper entry found

UnCheck the Auto Genrate Option and let the weblogic server to generate this file at run time for your EAR application

Assign concurrent programs to Request Group

Request group is required to allow submission of concurrent programs or request set from a specific responsibility. First request group is created, then programs/request sets are added to request group.

To submit any program we need to associate it with specific responsibility. Identify  the request group assigned for that responsibility and then add concurrent program/request set to that request group, then program will be present in your that specific responsibility for submission.

Perform the below given steps for associating Concurrent Program with the Request Group

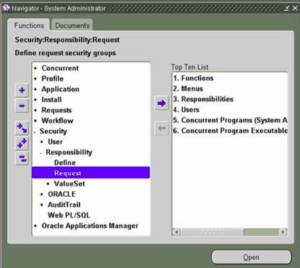
  1. Logon to ‘System Administrator’ responsibility.
  2. Go to Security-> Responsibility -> Request. Open this form.
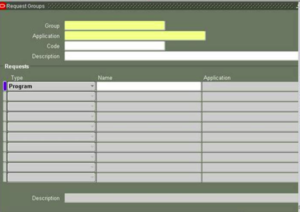
  3. Query for the request group name. If not present, add it by filling following fields: ( Group, Application, Code,Description)
  4. Save
Request Group for Concurrent Program submission

3. Double -click to open the Request Group Form

Request Group Form
Request Group Form

4. Press F11

5. If your concurrent program is associated to Purchasing  then enter the Group as ‘Purchasing%

6. Press CTRL + F11

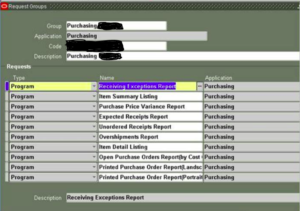
7.  The concurrent program for Purchasing will be listed

Request Group Purchasing Reports

8. Now we need to enter the Concurrent Program in this list of Request Group having Purchasing programs.  Select the First Records in the given list and then File -> New . This will provide a new line to enter the program details.

9. Enter the  below given details

Type:  Program

Name:  <NEW_CONCURRENT_PROGRAM_NAME>

Application: Purchasing

10.   Save

How to find the request group for a concurrent program ?

Sometimes we might need to know the associated Request Group for the running concurrent program. The below given SQL Query could be useful to identify request group by providing the Concurrent Program executable name as an input

SELECT FA.APPLICATION_SHORT_NAME,
FRG.REQUEST_GROUP_NAME,
FE.EXECUTION_FILE_NAME,
FE.EXECUTABLE_NAME
FROM FND_REQUEST_GROUP_UNITS FRGU,
FND_CONCURRENT_PROGRAMS FCP,
FND_REQUEST_GROUPS FRG,
FND_EXECUTABLES FE,
FND_APPLICATION FA
WHERE
FRGU.REQUEST_UNIT_ID = FCP.CONCURRENT_PROGRAM_ID
AND FRGU.REQUEST_GROUP_ID = FRG.REQUEST_GROUP_ID
AND FRG.APPLICATION_ID = FA.APPLICATION_ID
AND FE.EXECUTABLE_ID = FCP.EXECUTABLE_ID
AND FE.EXECUTABLE_NAME = '<&CONCURRENT_PROGRAM_EXEC_NAME>';

Oracle EBS R12 User Creation and Adding Responsibility

User has to be defined in the system to be able to log into oracle applications. Each user should have at least one responsibility assigned and it should not be end dated. User should be not end dated.

Oracle Apps User Creation
  1. Log into ‘System Administrator’ responsibility.
  2. Go to Security-> User-> Define. Open the form
  3. Query for the user id, if not present. Add user by filling following fields:

User Name: Name of the user

Password: This will be initial password

Description:  Description for the created user

Password Expiration: (It is always ‘none’ for support instances)

Effective Dates: from : <current date>

To: <leave this blank unless you want to deactivate user after a specific date>

Oracle Apps User Responsibility

4. Go to below section, to add responsibility to user:

Responsibility: List of responsibilities available for the user

Description: Custom description for the added responsibility

From:  Date from when responsibility to be activated

To: <leave this blank unless you want to deactivate this responsibility for that user >

Oracle ADF Best Practices for web based application development

The Application Development Framework provides numerous controls and components to make Rich Client UI for the application. The following given best practices can allow the developer to use the available controls and components in the most optimized way.

  1. Avoid using the invokeAction in pageDefbecause will be executed several times. Use a task flow with a method call and the page can be reused in other task flows.
  2. Do not create view criteria’s containing the name of the view since the name of the view can be changes thus require change in the View Criteria also.
  3. Service methods should not be called from the application model as they are dependent of the view iterators Standard operators like standard operations CreateWithParams, ExecuteWithParams can be used to achieve the same.
  4. Always prefer to create the template for the JSP pages and include that in corresponding pages. The UI controls like Panel Splitter, PanelGroupLayout can be used with different facets using the common template structure.
  5. Prefer to create the iterators for the view in the service method ( java bean class) and default iterator provided by view object should be avoided.
  6. Avoid adding HTML content in the JSF pages. Styles or CSS files should be used instead as ADF Framework provides support for that.
  7. Do not use multiple database connection for the same Database, prefer to use nested application module (AppModule).
  8. Do not combine view accessors with data model master-detail because accessor attributes create distinct row sets based on an internal view object other than that from detail
  9. When a view criteria is applied programmatically in a business method from the application model later the view criteria must be removed.
  10. Always use the Connection Type as ‘JDBC DataSource’ and provide the JNDI name defined in the Data Source of Web Logic Server to leverage the Connection setting and pooling techniques provided by the Application Server.
  11. Avoid using the view’s attributes in the WHERE clause for filtering, instead use default criterias for each view instance from the application model
  12. Always define the scope in the JSF Page to use the page variables. Following scopes are used:
  • RequestScope,
  • backingBeanScope,
  • viewScope,
  • pageFlowScope,
  • sessionScope,
  • applicationScope,
  • backingBeanScope

SessionScope and PageFlowScope are preferred if the pages have limited variables and are required to be used by other applications pages.

  1. In the context of fragment based task flows, use viewScope in preference to request scope for a more predictable behavior within the context of the sub-flow that contains the fragments
  2. Use SetPropertyListenerinstead of SetActionListener for passing the values.
  3. Create separate style sheet for different devices in the application and retrieve the value from the <skin-family> tag.
  4. Avoid using heavy images as it increases the loading time of the page.

Self Signed certificate in Weblogic Server using Keytool

Self signed certificates are used by developers to validate the https configuration and testing.  Below given are the steps to configure and test self signed certificate

  • Navigate to the JRE/bin path and execute the keytool.exe to verify if that is installed properly
  • Create the directory csr    –      mkdir csr
  • Execute the keytool command to generate the identity.jks

keytool -genkey -alias testCert -keyalg RSA -keypass privatepassword -keystore identity.jks -storepass password -validity 365

  • Enter the information asked for Organization, State, City and Country
  •   export the certificate from identity keystore into root.cer

keytool -export -alias testCert -file root.cer -keystore identity.jks  -storepass password

  •   export the certificate from identity keystore

keytool -import -alias mykey -file root.cer -keystore trust.jks -storepass password

  •  Enter the password- password (mentioned above)

keystore identity password

  •  Log into the Web Logic Server
  •   Click on Server -> Admin Server
  •  Click on Key Store tab
  • Click on the CHANGE button to modify the key store settings
  • Select the custom Identity and Custom Trust from the available option for the key stores

Custom Identity and Custom Trust Keystore

  •  Copy the generated Identity.jks and keystore.jsk files on the server path so that they can be selected as given below.
  •  Modify the port for SSL in the General tab with 4443 (default)

Custom Identity and Custom Trust Keystore in Web logic Server

  • Click on Save and  activate the changes

LDAP Server Configuration in Web Logic Server

Following steps need to be performed to integrate the LDAP Server with the Oracle Web Logic Server 10.3.5

  •  Log into the Web Logic Server Console.
  • Select the Security realm in the Domain Structure (on the left side)
  • Click on myrealm in the realm section.
  • Click on Providers Tab in the setting section of myrealm
  • Click New in the Authentication Providers table.

ldap_Server_1_2

  •   Enter an appropriate name for Authentication Provider- (Example –TestAuthenticator)

ldap_Server_1_1

  • Select the Authenticator Provider to be used.

Ldap Authentication Provides in Web Logic Server

Ldap Authentication Provider in Web Logic Server

Ldap Authentication Providesrin Web Logic Server
Ldap Authentication Provider in Web Logic Server

    Click OK.
  • In the list of Providers, click on the newly created TestAuthenticator.
  • In the Common Tab for the Provider – TestAuthenticator, change the Control-Flag value from OPTIONAL to SUFFICIENT

Authenticator Control Flag

  • Click Save
  • For the Provider – TestAuthenticator, go to the Provider Specific Tab and enter the required information to connect to the Directory Server.

ldap authentication provider configurations

  • In the list of Providers, Click on REORDERS button to move the newly created TestAuthenticator on the top so that it can be executed

Reordering for ldap authentication provider

Reorder Authentication Provider

  • Save the Changes.
  • Restart the server and log into Web Logic Server Console.
  • Select the User and Groups Tab for the myrealm section and check for the list of available users retrieved from the LDAP Server.