Apache Maven Tutorial

The Apache Maven tutorial provides the basic and advanced concepts of Apache Maven. The Apache Maven tutorial is for the developers, beginners and professionals to understand the overall build and dependency process during project development.

Project development goes through various process like coding, build, deployment , testing before it is being developed completely to be deployed into production. The build and deployment process is a tedious and time consuming process and requires tasks such as adding library dependencies, additional project jars on the project class path, code compilation and fixing compilation issues, deploying compiled artifacts to the environment as JAR, WAR, EAR files. Apache Maven automates the above mentioned tasks and helps in reducing the overall deployment process, minimizing human errors and separates it as an activity than code development process.

Apache Maven is a powerful project management and build tool which is based on Project Object Model (POM) and is used for project build, project dependency and documentation. Project Object Model is used as pom.xml in the project which contains project and configuration information used by maven to build the project dependencies, build directory, source directory, managing project class path, managing file extensions, etc.

Benefits of using Apache Maven as the build tool

The Apache Maven is a similar tool like ANT but it provides additional features which makes it more common choice for the developers. The below are the advantages of apache maven:

  • Simplifies the Project Setup: Apache Maven provides project templates named archetypes which simplifies the project configuration process.
  • Manages Dependency Management: Automates the validation and compatibility process and manages the dependencies for the project.
  • Project Dependencies: Apache Maven retrieves the project dependencies from the dependency repositories
  • Plug-in Dependencies: Apache Maven retrieves the plug-in dependencies from the plugin repositories
  • Central Repository System: Apache Maven using the Central Repository System for public repositories

Thus , we can say that Apache Maven is a project management and build tool and helps in managing the below:

  • Build
  • Dependencies
  • Documentation
  • Releases
  • Distribution
  • Reporting
  • SCMs

Difference between Ant and Maven

The below given are the primarily difference between the ANT and Maven.

  • Project Structure details are required to be provided when using ANT as the build tool, whereas it is not required while using Maven. It uses the project templates called archetypes for project configuration.
  • Developers need to defined the ordering of steps (makes ANT a procedural approach) to be executed through ANT build whereas Maven is declarative and executes build based on configuration defined in pom.xml file.
  • ANT build doesn’t follow any life cycle whereas Maven processes the defined life cycle.
  • ANT is more as a build tool whereas Maven is a Framework which includes project management and build processes.
  • ANT scripts are project specific and cannot be resused whereas Maven is declarative and can be reused.

Apache Maven Life cycle

The Apache Maven used the Build Life cycle to clearly define the process for building and distributing the project artifacts. The below given are the build life cycles for the maven

  1. Default: manages the project deployment process
  2. Clean: manages the project cleaning process
  3. Site: manages the project documentation

Apache Maven build life cycle phases

The Maven build life cycle goes through various phases which are given below:

  • Validate: validates the project related information
  • Compile:helps in compiling the source code of the project
  • Test: validating the compiled source code using unit testing framework
  • Package:converts the compiled source code into distribution format like JAR, WAR, EAR files
  • Verify: executes the integration test to ensure quality standards are met
  • Install: helps in installing the package ( JAR /WAR/EAR file) to the local repository
  • Deploy: helps in deploying the package from local repository to the build environment.

Apache Maven plugin goals using Command line execution

The Maven plugin is the collection of goals to be executed in different phases of the maven life cycle. The Maven plugin determines the order in which these goals are to be executed. Let’s try to understand how the above mentioned build life cycle phases gets executed when using the maven commands

mvn verify – This command performs the default life cycle . within default life cycle , it executes the Validate, compile, test , package phases before executing the verify. The maven commands checks and executes the required previous phases based on the command execution.

mvn clean deploy – This command is the performs the Clean life cycle which means maven does the project cleaning and then executes the deploy process for the project.

List of available plugin from Apache maven- https://maven.apache.org/plugins/

Apache Maven installation process on windows

The Apache Maven installation is supported on Windows, Linux , Mac OS platforms. Let’s go through the maven installation on windows.

  • Download Apache from the official site : https://maven.apache.org/download.cgi
  • Minimum JDK1.7 or above is to be installed on the computer for Maven to work
  • Ensure that the environment variable (JAVA_HOME) is set for java path
  • Ensure that the environment variable (MAVEN_HOME) is set for the maven path
  • Add Maven path in the Environment variable
  • Execute maven -verison on the command prompt to verify the maven installed version
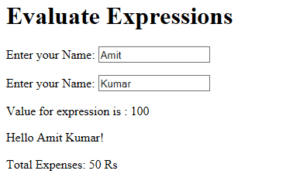

angularJS expression example

AngularJS expressions are JavaScript-like code snippets used to bind application data to html.  The syntax for the Expressions uses  double braces like {{ expression}} or {{ 1+1 }} . The below given are the valid expressions in the angularJS script execution

  • 5+5
  • x+y
  • user.name
  • products[index]

The below sample shows the usage of different ways of executing expressions in angularJS

Sample code:

<html>
<head>
<script src = “https://ajax.googleapis.com/ajax/libs/angularjs/1.5.2/angular.min.js”></script>
</head>
<body>
<h1>Evaluate Expressions</h1>
<div ng-app = “” ng-init = “quantity = 5;cost = 10;”>
<p>Enter First Name: <input type = “text” ng-model = “firstName”></p>
<p>Enter Last Name: <input type = “text” ng-model = “lastName”></p>

<p>Value for  expression is : {{ 50 + 50 }}</p>
<p>Hello {{firstName + ” ” + lastName}}!</p>
<p>Total Expenses: {{cost * quantity}} Rs</p>

</div>
</body>
</html>

angularJS expressions


angularJS bind input variable

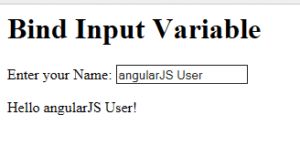
The blog shows the simple example of how to bind the input variables in the angularJS .

The ng-bind directive  binds the values of AngularJS application data to HTML input controls.

Example

<div ng-app = ""> 
   ...
   <p>Enter your Name: <input type = "text" ng-model = "userName"></p>
</div>

Sample Code:

<html>
<head>
<script src = “https://ajax.googleapis.com/ajax/libs/angularjs/1.5.2/angular.min.js”></script>
</head>

<body>
<h1>Bind Input Variable</h1>

      <div ng-app = “”>
<p>Enter your Name: <input type = “text” ng-model = “name”></p>
<p>Hello <span ng-bind = “name”></span>!</p>
</div>

</body>
</html>

ngularJS bind input variable


angularJS helloworld sample program

AngularJS is a Javascript Framework which  extends HTML with ng-directives. Below are the directives shown:

  1. ng-app directive defines an AngularJS application
  2. ng-init directive initializes AngularJS application variables
  3. ng-model directive binds the value of HTML controls (input, select, textarea) to application data.
  4. ng-bind directive binds application data to the HTML view

The following steps will be performed when executing the angularJS in the HTML Page

  1. Load the angularJS Framework
  2. Define the usage of the angularJS Application by using ng-app directive
  3. Usage of the initialization by using the ng-init directive
  4. Define the model name by using ng-model directive
  5. Binding of the defined model ng-bind directive

Sample Code

<!doctype html>
<html>

<head>
<script src = “https://ajax.googleapis.com/ajax/libs/angularjs/1.5.2/angular.min.js”></script>
</head>

<body ng-app = “myapp”>

<div ng-controller = “HelloController” >
<h2>Welcome {{helloTo.title}} to the world of AngularJS!</h2>
</div>

<script>
angular.module(“myapp”, [])

.controller(“HelloController”, function($scope) {
$scope.helloTo = {};
$scope.helloTo.title = “User”;
});
</script>

</body>
</html>


AngularJS Environment Setup details

Please find below the steps to get the angularJS installed in your local environment.

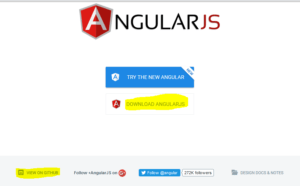
  • Navigate to the site https://angularjs.org
  • Click on the Link DOWNLOAD ANGULARJS

    angularJS environment setup
    angularJS environment setup

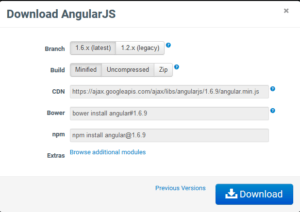
Download the Angular JS by providing the required options. The branch options provides the downloads for legacy version and latest versions. Download the latest version only.

download angularJS
download angularJS

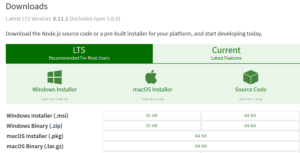
node and npm installers


Top Beginners guide to AngularJS Tutorial

AngularJS is a JavaScript framework. It was originally developed in 2009 by Misko Hevery and Adam Abron. As per AngularJS  official documentation – https://docs.angularjs.org/guide/introduction

“AngularJS is a structural framework for dynamic web apps. It lets you use HTML as your template language and lets you extend HTML’s syntax to express your application’s components clearly and succinctly. Angular’s data binding and dependency injection eliminate much of the code you currently have to write. And it all happens within the browser, making it an ideal partner with any server technology . It Provides

  • Data binding, as in  double braces
  • DOM control structures for repeating, showing and hiding DOM fragments.
  • Support for forms and form validation.
  • Attaching new behavior to DOM elements, such as DOM event handling.
  • Grouping of HTML into reusable components  “

It can be added to an HTML page with a <script> tag.

AngularJS extends HTML attributes with Directives, and binds data to HTML with Expressions

<script src=”https://ajax.googleapis.com/ajax/libs/angularjs/1.6.4/angular.min.js”></script>

AngularJS extends HTML with ng-directives. below are the directives shown:

  1. ng-app directive defines an AngularJS application
  2. ng-init directive initializes AngularJS application variables
  3. ng-model directive binds the value of HTML controls (input, select, textarea) to application data.
  4. ng-bind directive binds application data to the HTML view

AngularJS Features:

  1. AngularJS is an open source framework
  2. AngularJS provides cross browser support
  3. AngularJS helps in creating Rich Internet Applications (RIA)
  4. AngularJS facilitates developers to build client side applications with Model View Controller (MVC)
  5. AngularJS data-binding component provides sync of data between the model and view components
  6. AngularJS Scope holds the data received from Model and provides it to the View
  7. AngularJS Controller are JavaScript Functions bounded with a particular scope.
  8. AngularJS Services provides available built in services which can be instantiated as per application need.

Example –  $http to make XMLHttpRequests

  1. AngularJS Directives –  ng-init, ng-app, ng-model , ng-bind are built in directives provided by AngularJS. We will see them in details in the next provided sections
  2. AngularJS Routing is the concept of switching among different views.
  3. AngularJS Cloaking is the concept which can be declared on an element to tell AngularJS that element requires cloaking (hide it even if its allow to be rendered)

12. AngularJS Promises helps to handle the long running httpRequest and redirect according to success and failure responses . Promises in Angular are implemented with $q