Learn REPL Tutorial in Nodejs

The tutorial provides insight on the node.js REPL( Read Eval Print Loop) Tutorial. The node.js REPL provides the console to execute the commands similar to Windows Console or Linux Console where executed commands receives the response / output in an interactive mode.

Let’s discuss REPL( Read, Eval, Print and Loop) in details. REPL performs the below given tasks:

REPL command REPL command Description
ReadReads user entered input data, parses the input into JavaScript data structure, and stores in memory
Evalevaluates the java Script data structure
PrintPrints / Display the response/ output
Loopexecutes the print command till user presses Ctrl+C twice

How to start REPL

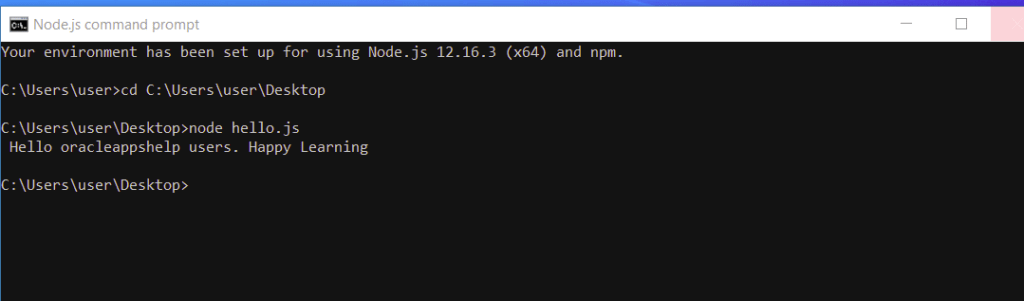
To start the REPL, you need to enter the “node” command in the node.js command prompt

Node.js – create expressions using REPL

Node.js command prompt is to be used for entering the expressions by executing the below given example

Node.js – variable assigment using REPL

The Node.js allows to create variables to store the value like other scripting languages. The var command is used to create variable but values store using var cannot be printed directly and we need to use the console.log() for printing variable values.

The variable beta value is printed but using the console.log function.

If var keyword is not used , then the value is stored in the variable and printed. The variable aplha is only printed with the value.

Nodejs – REPL underscore variable

The underscore (_) variable is used in node.js to get the last result

The variable sum uses (_) which captures the sum value of alpha and beta

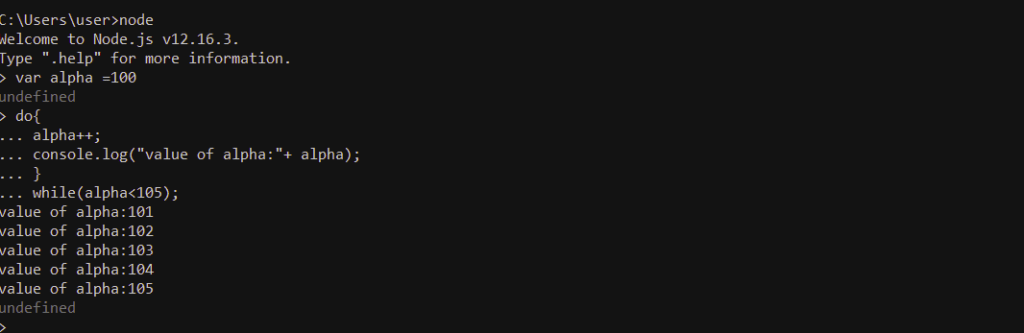
Node.js multiple line expressions ( Loop in REPL)

Node.js provides the multiple line expression just like other scripting language . The common example could be a do..while loop where the value of alpha is incremented .

Node.js REPL commands

The below given are the avaialbel node.js REPL commands

REPL commands REPL command Description
ctrl +cterminates the current command
ctrl+ c ( 2 times)terminates the node REPL
ctrl +d terminates the node REPL
up /down keysup key -> displays command history
down key -> modify the previous command
tab key displays list of current commands
.helpdisplays list of help commands
.break exit from multiple line expression
.clearexit from multiple line expression
.save <filename>saves the node REPL Session into the file
.load <filename>loads the saved file content in the current node REPL Session

Components and Modules in Node.js

We have seen the Nodejs Tutorial steps in the previous blog. Now lets understand the main and commonly used components and the modules in the Node.js and its usage in the Node.js application.

Node.js Components

Node.js uses the below given components:

  • Import required modules: Node.js application use the require directive to load the node.js modules

var http = require(“http”);  

  • Create Server: The server which listens to the node.js application request
  • Request & Response: The node.js server will intercept the requests from the browser / console and returns the response back to the client application.

Refer the below program which makes the use of these components

var http = require(‘http’);
var requestListener = function (req, res) {
res.writeHead(200);
res.end(‘Hello, World!’);
}

var server = http.createServer(requestListener);
server.listen(8080, function() { console.log(“Listening on port 8080”)})

Node.js modules

Node.js is built on JavaScript framework and creates .js files for processing. Node.js modules provides the functionality to add the encapsulation logic for segregating the functionality into different modules. Node.js provides the below available modules :

  • Express Framework: The provides the features to develop robust web and mobile applications
  • MongoDB: provides support for the MondoDB and Node.js integration for database operations
  • Restify: Framework to support REST APIs integration
  • Jade: provides high performance template engine for nodes and browsers
  • Bluebird: provides promise library with full of feature and performance enhancements
  • Socket.io: provides real -time bi-directional event based communication, mpostly use for developing chat application

Node.js build modules

Node.js provides the in-built modules for processing the java script application.

Module Name Module Description
assertProvides a set of assertion tests
bufferhandles binary data
child_processfor running the child processes
clustermanages multiple node processing
cryptomanages OpenSSL cryptographic functions
dgrammanages UDP datagram sockets
dnsmanages DNS Lookup and name resolution functions
domaindeprecated now.
eventsmanages events
fsmanages file system
httpmanages node.js to run as HTTP Server
https manages node.js to run as HTTPS Server
nethelps in creating server & clients
osprovides operating system data
pathmanages file path
punycodedeprecated now
querystringmanages URL query strings
readlinemanages readable streams one line at the time
streammanages streaming data
string_decoderdecodes buffer objects to strings
timersexecute a function after a given number of milliseconds
tlsmanages TLS and SSL protocols
ttyProvides classes used by a text terminal
urlparse URL strings
utilprovides utility functions
v8accesses information about V8 (the JavaScript engine)
vmcompiles JavaScript code in a virtual machine
zlibcompress or decompress files

console module in node.js for debugging

The tutorial provides the debugging mechanism provided by node.js console module and the console methods which can be used based on programming requirements.

node.js console methods

The node.js console module provides the below console methods used in the node.js stream

  • console.log ( ) – used for displaying the message / output on the console.

Example – Enter the below command and save the file as “hello.js”

console.log(‘ Hello oracleappshelp users. Happy Learning’);

Execute the file -> node hello.js

  • console.error ( ) – used for displaying the error message on the failure of the processing.

Example: below command depicts console.error message.

console.error(new Error (‘ERR1001 – The data processing is failed’));

  • console.warn ( ) – used to display the Warning / Informational message.

Example: below command depicts console.warn message.

Node.js installation in Windows /Linux OS

To proceed further in details about nodejs , lets go through the step by step Nodejs installation. NodeJs is cross-platform can thus can be installed from Windows to Ubuntu and OS X. Nodejs framework provides support for embedding external functionality though available modules or through custom modules like Nodejs provides integration with MongoDB and with MySQL for the database operations.

Nodejs windows installation

Nodejs installation process includes the installation of Nodejs libraries on the client system to make the environment ready for development.

  1. Download the stable Nodejs version from the official site https://nodejs.org/en/download/ . Latest LTS Version: 12.16.3 (includes npm 6.14.4)
  2. Check if the Windows system is 32-bit or 64-bit processor

3. Select installer and get it downloaded.

4. Run the executable and it will open the nodejs setup screen.

5. Click Next

6. Accept the Terms for License Agreement

7. Specify the location for the Nodejs installation folder in Windows Directory. Click Next

8. Accept the default component ( Nodejs runtime ) and Click Next

9. Click Next

10. Click Install button

11. Nodejs installation setup completed .

12. Click Finish button

Installation on UNIX/Linux/Mac OS X, and SunOS

  1. Download the stable Nodejs version from the official site https://nodejs.org/en/download/ . Latest LTS Version: 12.16.3 (includes npm 6.14.4)
  2. Linux and Mac OS respective installer file

Mac OS : node-v12.16.3-darwin-x64.tar.gz
Linux OS : node-v12.16.3-linux-x64.tar.gz

3. Execute the below commands for the installation

$ cd /tmp
$ wget http://nodejs.org/dist/v12.16.3/node-v12.16.3-linux-x64.tar.gz
$ tar xvfz node-v12.16.3-linux-x64.tar.gz
$ mkdir -p /usr/local/nodejs
$ mv node-v12.16.3-linux-x64/* /usr/local/nodejs

4. Add /usr/local/nodejs/bin to the PATH environment variable

export PATH=$PATH:/usr/local/nodejs/bin

Top Node.js tutorial for beginners

Node.js is one of the most popular JavaScript Framework, is a server-side platform developed by Ryan Dahl in 2009 and built on Google Chrome’s JavaScript Engine (V8 Engine). Node.js provides the cross-platform runtime environment , driven on events and executes asynchronous transactions helps in building I/O intensive web applications, single-page applications, server based and network applications with ease. Node.js is open source, completely free, and used by thousands of developers around the world.

Node.js tutorial covers topics on Node.js installation on windows and linux, REPL module in Node.js, NPM module in Node.js, Node.js callbacks examples , Node.js event loop examples, Node.js OS module examples , Node.js Path module examples , Node.js query string examples, Node.js URL examples , cryptography in Node.js, Node.js debugger examples , DNS module in Node.js , Node.js Net module example, Node.js UDP example, process example in Node.js , child processes in Node.js, buffer module example in Node.js, streams example in Node.js, file system module in Node.js, global objects in Node.js, NodeJS web modules , module level object scope in Node.js

Node.js tutorial provides the basic and advanced concepts of Node.js.Knowledge of HTML /CSS/ AJAX should be useful.

Lets consider a simple server based processing scenario and where node.js executes client request in asynchronous fashion and eliminates the waiting time to be ready for processing next request.

PHP / ASP/ Java
based server processing
Node.JS server processing
Client submit the data request for processingClient submit the data request for processing
Client waits till the request is getting processedNo wait is required at client side
Server processes the request and sends it back to the Client Client is ready to process next request
Client is ready to process next requestWhen Server processes the request and sends it back to the Client

which conlcudes that Node.js runs single-threaded, non-blocking asynchronously programming and provides better memory efficiency.

What node.js provides to the developers ?

The below given are the features which makes it more popular among developers

  • Node.js helps in developing dynamic page content
  • Node.js provides numerous file based operations (create, open, read, write, delete, and close files on the server)
  • Node.js helps in collecting form data
  • Node.js provides feature for CRUD operations (Create, Read, Update ,Delete on the database

Node.js Download

The node.js can be downloaded from the Node.js official web site https://nodejs.org

Node.js sample file run

Once the successful installation, try to validate the node.js by executing the below sample program.

var http = require('http');
var requestListener = function (req, res) {
  res.writeHead(200);
  res.end('Hello, World!');
}
var server = http.createServer(requestListener);
server.listen(3000, function() { console.log("Listening on port 3000")});

Node.js Tutorial Topics

The below given are the common topics for beginners to learn Node.js.

Node.js installation on Windows / Linux OS

Tutorial explains the step by step process for installing node.js on windows / Linux OS

Components and module in Node.js

Tutorial explains the usage of components and module in node.js with examples

Punnycode module in Node.js

Tutorial explains the node.js punnycode module with examples

String Decoder in Node.js

Tutorial explains the node.js string decoder with examples

Query String in Node.js

Tutorial explains the node.js query string with examples

Console in Node.js

Tutorial explains the usage of console in node.js with examples

Path module in Node.js

Tutorial explains the path module in node.js with examples

TTY module in Node.js

Tutorial explains the tty module in node.js with examples

File System module in Node.js

Tutorial explains the file system module in node.js with examples

Streams module in Node.js

Tutorial explains the streams module in node.js with examples

TLS SSL module in Node.js

Tutorial explains the tls ssl module in node.js with examples

Crypto module in Node.js

Tutorial explains the crypto module in node.js with examples

Net module in Node.js

Tutorial explains the net module in node.js with examples

OS module in Node.js

Tutorial explains the os module in node.js with examples

DNS module in Node.js

Tutorial explains the dns module in node.js with examples

Error Handling in Node.js

Tutorial explains the error handling in node.js with examples

Buffer Class in Node.js

Tutorial explains the buffer class in node.js with examples

Global and module level objects in Node.js

Tutorial explains the scope for global objects and module level objects in node.js with examples

Command Line Options in Node.js

Tutorial explains the command line options in node.js with examples

REPL module in Node.js

Tutorial explains the REPL module in node.js with examples

Node.js MySQL Integration examples

Node.js example to create MySQL table

Tutorial provides the node.js integration program to create MySQL table

Node.js example to drop MySQL table

Tutorial provides the node.js integration program to drop MySQL table

Node.js example to Insert records into MySQL table

Tutorial provides the node.js integration program to insert record into MySQL table

Node.js example to Select records from MySQL table

Tutorial provides the node.js integration program to select record from MySQL table

Node.js example to Update records into MySQL table

Tutorial provides the node.js integration program to update record into MySQL table

Node.js example to Delete records from MySQL table

Tutorial provides the node.js integration program to delete record from MySQL table

Core Java – Java Class and Objects

Java is an object oriented programming language and its is driven based on Java Classes and Object instantiation. The tutorial provides how to create Java Classes and instantiate object on the class.

What is Object in Java ?

An Object is a group of related items grouped together and can have characteristics like state and behavior.

Lets consider Room as an Object , then Blackboard, Table, chair, Chalk are considered as its State (attributes /fields) and totalChairs and TotalTables are considered as behaviour (methods) which defines the Room as an Object.

Similarly a furniture being an object could have attributes like table, chair, dine table, stool, sofa,etc.

Example -1

  • Object – Room
  • State – Blackboard, Table, chair, Chalk
  • Behavior – Seat Capacity, TotalChairs, TotalTables

Exmaple -2

  • Object -SwtichBoard
  • State – On or Off
  • Behavior – TurnOff / TurnOn

What is class in Java ?

Class in java acts as the Object constructor or we can say that its the blueprint which defines the attributes for the created object.

The Class contains the variables (State) and methods . The below given is the class with name Furniture and has variables

/**
 *  Oracleappshelp.com - Java Basics Tutorial
 *  Program - Class Creation and Object Instantiation Example
 *   */
package core.java.oracleappshelp.basics;
public class Furniture {
	String strTable;
	String strChair;
	String strSofa ="Recliner";
	String strDineTable;
	public static void main(String[] args) {
		// Object Creation for the Class Furniture 
		Furniture furnitureObj = new Furniture();
		// Basic Output 
		System.out.println("This is basic furntiure class..");
		
		// Object instantiation and execution
		System.out.println("The Sofa Type is :" +  furnitureObj.strSofa);
	}
}
Output: 
This is basic furntiure class..
The Sofa Type is :Recliner

Now consider the modified class which has varibles with setter and getter methods and a Method invocation

/**
 *  Oracleappshelp.com - Java Basics Tutorial
 *  Program - Class Creation and Object Instantiation Example
 *   */
package core.java.oracleappshelp.basics;
public class Furniture {
	
	String strTable;
	String strChair;
	String strSofa ="Recliner";
	String strDineTable;
	public static void main(String[] args) {
		// Object Creation for the Class Furniture 
		Furniture furnitureObj = new Furniture();
		// Basic Output 
		System.out.println("This is basic furntiure class..");
		
		// Object instantiation and execution
		System.out.println("The Sofa Type is :" +  furnitureObj.strSofa);
		furnitureObj.setSofaType();
	}
	
	public void setSofaType()
	{
	    this.setStrSofa("3 seater sofa");
	    System.out.println("The Sofa Type is :" +  this.getStrSofa());
	}
	
	public String getStrTable() {
		return strTable;
	}
	public void setStrTable(String strTable) {
		this.strTable = strTable;
	}
	public String getStrChair() {
		return strChair;
	}
	public void setStrChair(String strChair) {
		this.strChair = strChair;
	}
	public String getStrSofa() {
		return strSofa;
	}
	public void setStrSofa(String strSofa) {
		this.strSofa = strSofa;
	}
	public String getStrDineTable() {
		return strDineTable;
	}
	public void setStrDineTable(String strDineTable) {
		this.strDineTable = strDineTable;
	}
}
Output: 
This is basic furntiure class..
The Sofa Type is :Recliner
The Sofa Type is :3 seater sofa

XSD Tutorial – XSD Numeric Data Type

XSD Tutorial covers topics on XSD Data XSD Tutorial covers topic on XSD Data Types, XSD Text , XSD Mixed, XSD Indicators, XSD Substitution ,XSD Examples, XSD Numeric, XSD Elements.

We discuss XSD Numeric Data Type in detail

The XSD Numeric data are used to depicts the XML data in the form of Integer and Decimal.

<xs:integer> numeric data type

<xs:integer> data type depicts the integer value in the XML document

<xs:integer> example:

<xs:element name=”age” type=“xs:integer”/>

<age>28</age>

<xs:decimal> data type

<xs:decimal> data type depicts the decimal value in the XML document

<xs:decimal> example:

<xs:element name=”price” type=“xs:decimal”/>

<age>20.50</age>

Numeric Data Types

S. No       Name Description
1 byte value with 8-bit integer 
2 decimal decimal value 1.15
3 int value with 32-bit integer 
4 integer integer value
5 long value with 64-bit integer 
6 negativeInteger an integer with negative values (-1,-2,-3…)
7 nonNegativeInteger an integer with negative values (0,1,2…)
8 nonPostiveInteger an integer with non positive values  (0,-1,-2…)
9 positiveInteger an integer with positive values (1,2…)
10 short an unsigned 16-bit integer
11 unsignedShort an unsigned 16-bit integer
12 unsignedLong an unsigned 64-bit integer
13 unsignedInt an unsigned 32-bit integer
14 unsignedByte an unsigned 8-bit integer

XSD Tutorial – XSD Date and Time

XSD Tutorial covers topics on XSD Data Types, XSD Date, XSD Empty, XSD Text , XSD Mixed, XSD Indicators, XSD Substitution ,XSD Examples, XSD Numeric, XSD Elements .

Lets discuss the XSD Date and Time <xs:date> Data Types in detail

The XSD Date <xs:date> data type depicts the Date and Time format in the XML Document.

<xs:date> format

The <xs:date> format (YYYY-MM-DD) in the XML Document depicts

  • YYYY depicts the Year
  • MM depicts the Month
  • DD depicts the Date

<xs:date> example

The below example depicts the data representation in Date format in the XML document

<xs:element name=”createdDate” type =”xs:date” />

Output : <createdDate>2020-05-07</createdDate>

XSD Date TimeZone

The TimeZone values can be handled in the date by applying the below formats

  • Converting the Date with TimeZone , the date can be appended with “Z” for UTC TimeZone like <createdDate>2020-05-07Z</createdDate>
  • Converting the Date with TimeZone, the data can be appended with Positive or negative time like

<createdDate>2020-05-07-04:00</createdDate> // reduces 4 hours from current system time

<createdDate>2020-05-07+04:00</createdDate> // increases 4 hours from current system time

<xs:time> data type

<xs:time> data type depicts the time in the format hh:mm:ss where

  • hh depicts the hour
  • mm depicts the minute
  • ss depicts the second

<xs:time> example:

<xs:element name=”creationTime” type =”xs:time”/>

<creationTime>05:07:21</creationTime>

<xs:datetime> data type

<xs:date> data type depicts the date format (YYYY-MM-DD)

<xs:time> data type depicts the time format (hh:mm:ss)

<xs:datetime> data type depicts the date and time format together (YYYY-MM-DDThh:mm:ss) where

  • YYYY depicts the Year
  • MM depicts the Month
  • DD depicts the Date
  • T depicts the start of the Time vlaue
  • hh depicts the hour
  • mm depicts the minute
  • ss depicts the second

<xs:element name=”creationDateTime” type =”xs:datetime”/>

<creationDateTime>2020-05-07T05:07:21</creationDateTime>

<xs:duration> data type

<xs:duration> depicts the time interval using ” PnYnMnDTnHnMnS ” format where

  • P depicts the period (required)
  • nY depicts the number of years
  • nM depicts the number of months
  • nD depicts the number of days
  • T depicts the start of a time vlaue
  • nH depicts the number of hours
  • nM depicts the number of minutes
  • nS depicts the number of seconds

<xs:duration> example

<xs:duration>P1Y</xs:duration> // depicts period of 1 year

<xs:duration>P1Y2M</xs:duration> // depicts period of 1 year 2 month

<xs:duration>P1Y2M3D</xs:duration> // depicts period of 1 year 2 month 3 Days

XSD Tutorial – XSD String Data Types

XSD Tutorial covers topics on XSD Data Types, XSD Date, XSD Empty, XSD Text , XSD Mixed, XSD Indicators, XSD Substitution ,XSD Examples, XSD Numeric, XSD Elements .

Lets discuss the XSD String Data Types in detail

XSD String <xs:string> Data Type

The Data Types are required in the XML Document to represent the data in different formats like Text, Number etc. XSD String Data Type is provided to represent the characters in the XML Document. XSD String Data Type contains or supports

  • Characters,
  • Line Feed,
  • Tab characters &
  • Carriage Return

Lets see if we need to represent the User FirstName and LastName then element can be described as given below

<xs:element name=”firstName” type=“xs:string”/>

<xs:element name=”firstName” type=“xs:string”/>

Output:

<firstName>Mohit </firstName>
<lastName> Sharma </lastName>

or

<firstName> Mohit </firstName>
<lastName> Sharma </lastName>

XML Processor executes the received String Data Type element as it is

Normalized String Data Type

Normalized String Data Type also represent String data but it does not supports Line Feed, Carriage Returns and Tab Characters.

<xs:element name=”firstName” type=“xs:normalizedString”/>

<firstName>Mohit </firstName>
or

<firstName> Mohit </firstName>

XML Process executes the above String Data Type by replacing tabs with spaces.

XSD Token <xs:token> Data Type

The token data type has also derived from data type supporting characters, but while processing, the XML processor eliminates the line feeds, carriage returns, tabs, multiple spaces and leading and trailing spaces.

<xs:element name=”firstName” type=“xs:token”/>

<firstName>Mohit </firstName>
or

<firstName> Mohit </firstName>

Derived String <xs:string> Data Type

S. No       Name Description
1    ID used in Schema for depicting the ID attribute in XML Document
2 IDREF used in Schema for depicting the IDREF attribute in XML Document
3 language depicts the valid language
4 Name depicts Valid XML Name
5 NMTOKEN used in Schema for depicting the NMTOKEN attribute in XML Document
6 normalizedstring contains characters that does not supports line feeds, carriage returns, or tabs
7 string contains characters that supports line feeds, carriage returns, or tabs
8 token contains charatcter that does not supports line feeds, carriage returns, tabs, multiple spaces and leading / trailing spaces

String Restrictions

XSD String data types applies the below given restrictions:

  • Enumeration
  • length
  • minimum length
  • maximum length
  • pattern
  • whitespace


XQuery Tutorial – FLWOR expression

The XQuery Tutorial covers the topics on Xquery Functions, XQuery FLWOR, XQuery Syntax, XQuery Add, XQuery Select , extracting elements and attributes from XML documents, transform XML data to XHTML, XPath Operators , XPath Functions, XQuery Data Types, XQuery User-Defined Functions.

Letd discuss FLWOR expression in detail.

Xquery Tutorial on XQuery FLOWR expression shows how to binding XML nodes, XML sequences to variable, sorting the nodes and expected node return value.

What is FLWOR expression in XQuery ?

FLWOR is an acronym for “For, Let, Where, Order by, Return”. FLWOR is pronounced as “flower”.

For – selects the sequence of nodes
Let – binds the sequence to a variable
Where – use for nodes filtering
Order by – use for nodes sorting
Return – what to return

XQuery FLWOR node retrieval example

Lets consider the below given “order.xml” file and try to get the node retrieval based on price check where price for the order <30.

XQuery FLWOR Expression for price check:

doc(“order.xml”)/oracleappshelpOrder/order[price< 30]/orderId

The XQuery FLWOR Expression returns same result as per the below XQuery XPath expression

for $x in doc(“order.xml”)/oracleappshelpOrder/order
where $x/price<30
return $x/orderId

Xquery Output:

<orderId>12346</orderId>

<orderId>12347</orderId>

<oracleappshelpOrder>
<Order>
    <orderId>12345</orderId>
    <quantity>1</quantity>
  	<price>40<price>
</Order>
<Order>
    <orderId>12346</orderId>
    <quantity>1</quantity>
  	<price>25<price>
</Order>
<Order>
    <orderId>12347</orderId>
    <quantity>1</quantity>
  	<price>28<price>
</Order>
</oracleappshelpOrder>

XQuery FLWOR into HTML

Now , we can use the basic list tag to discplay the data into HTML

<ul>
for $x in doc("order.xml")/oracleappshelpOrder/order/orderId
order by $x
return <li>{$x}</li>
}
</ul> 

<ul>

<li><orderId>12346</orderId></li>

<li> <orderId>12347</orderId> </li>

</ul>

We can also list the actual data without the orderId tag by using the data ($x)

<ul>
for $x in doc("order.xml")/oracleappshelpOrder/order/orderId
order by $x
return <li>{data{$x}}</li>
}
</ul> 

The output will be :

<ul>

<li>12346</li>

<li>12347</li>

</ul>

XQuery Tutorial – Overview

The XQuery Tutorial covers the topics on Xquery Functions, XQuery FLWOR, XQuery Syntax, XQuery Add, XQuery Select , extracting elements and attributes from XML documents, transform XML data to XHTML, XPath Operators , XPath Functions, XQuery Data Types, XQuery User-Defined Functions.

Lets discuss XQuery in detail.

What is XQuery?

The XML data includes the XML elements or called XML “nodes” which should be valid and could be parsed in a well formed XML Document. The XML data need to be queried like we use SQL Query to Query the Database data.

Thus , XQuery is designed to help in Querying the XML data.

XQuery – Points to Consider

  1. XQuery is W3C recommedation and XQuery Version 1.0 is recommendation by W3C in 2007.
  2. XQuery is compatible with XML, Namespaces, XSLT, XPath, and XML Schema
  3. XQuery is the language used for querying the XML data
  4. XQuery is built on the XPath expressions

How XQuery is useful ?

The XQuery can be used for the below given reasons :

  1. XQuery is compatible with XML, Namespaces, XSLT, XPath, and XML Schema
  2. XQuery helps in extracting the information in a heterogeneous environment integrated using XML
  3. XQuery is useful in transforming the XML data to XHTML
  4. helps in searching web documents for the related information.
  5. XQuery helps in generating reports
<oracleappshelpuser>
<student>
    <firstName>Mohit</firstName>
    <lastName>Sharma</lastName>
  	<registered>Yes<registered>
</student>
<student>
    <firstName>Rahul</firstName>
    <lastName>Jain</lastName>
  	<registered>Yes<registered>
</student>
<student>
    <firstName>Abhishek</firstName>
    <lastName>Gupta</lastName>
  	<registered>No<registered>
</student>
</oracleappshelpuser>

XQuery – Retrieve XML Node data from XML Document

XQuery provides the XQuery Functions which are used for extracting / retrieving the XML Data from the XML “nodes” in the XML Document.

Example:

doc(“student.xml”) is the XQuery function to open the Student.xml file for Query the XML Document.

We will discuss more in detail for the Query Functions in the next blog.

XQuery – Navigate using XPath expressions

XQuery uses the in built XPath expressions for navigating to the XMl node in the XML Document

Example: If we need to navigate to the firstName node in the above provided student.xml , then the below expression should be used

doc(“student.xml”)/oracleappshelpuser/student/firstName

The XQuery output should be like:

    <firstName>Mohit</firstName>
	<firstName>Rahul</firstName>
	<firstName>Abhishek</firstName>

We will discuss more in detail for the Query XPath expression in the next blog.

XML Tutorial – Schema- XSD (XML Schema Definition)

The tutorial provides the insight on the XML Schema – XSD ( XML Schema Validation) which defines the structure for the XML Document like XML DTD ( Document Type Definition) .

XML Schema (XSD) and XML DTD both are used to validate the XML Document. In other words, we can say the “well-formed” or “valid” XML Document is VALIDATED against XML Schema.

XML Schema features

  1. XML Schema defines the structure for the XML Document written in XML
  2. XML Schema provides the description for the XSD format
  3. XML Schema provides the support for data types to be defined for each XML element
  4. XML Schema provides the support for XML namespaces
  5. XML Schema can be verified with the sample XML Data

XML Element

The defined XML Tags in the XML Document are elements. The XML elements should follow the below naming rules

  1. XML element is case-sensitive
  2. XML element can start with a “letter” or an “underscore”
  3. The letter “XML”, “xml” “Xml” “xMl” “xmL” are not support as element name as considered a Reserve word
  4. The XML Element can consistes of letters, digits, hyphens, underscores, and periods
  5. XML element with spaces is NOT supported

XML Attributes

XML Attribute stores the data for a specific XML element.

<student gender=’male’>

XML Element vs XML Attribute

XML Attributes are defined for the XML element. The first exmaple shows the usage of XML Attribute as gender in the student element whereas the next example shows the gender as the XML element belongs to the parent element “student”

XML Attribute – Points to Consider

  1. XML Attribute does not support multiple values
  2. XML Attribute does not support Tree structure
  3. XML Attribute is not flexible for change

<student gender="male">
  <firstname>Mohit</firstname>
  <lastname>Sharma</lastname>
</student> 

<student>
  <gender> male </male>
  <firstname>Mohit</firstname>
  <lastname>Sharma</lastname>
</student> 

Empty XML Element

XML Schema supports the empty XML element. The empty XML element also support attributes.

<nickName category=”personal” ></nickName>

The empty XML element has an attribute with category =”personal”

or

<nickName />

The below given is the Student XML Schema Structure , created using XML .

<xs:element name=”student”> depicts the XML element name
<xs:complexType> depicts that the element “student” has the complex type , means it contains multple XML elements
<xs:sequence> depicts the sequence of elements mapped for the XML element student with complex type
<xs:element name=”fisrtName” type=”xs:string”/> depicts the data type as “string” for the element firstName
<xs:element name=”lastName” type=”xs:string”/> depicts the data type as “string” for the element lastName
<xs:element name=”registered” type=”xs:string”/> depicts the data type as “string” for the element registered


<?xml version="1.0"?>
<xs:schema xmlns:xs="http://www.w3.org/2001/XMLSchema"
targetNamespace="https://www.oracleappshelp.com"
xmlns="https://www.oracleappshelp.com"
elementFormDefault="qualified">


<xs:element name="student">

<xs:complexType>
  <xs:sequence>
    <xs:element name="fisrtName" type="xs:string"/>
    <xs:element name="lastName" type="xs:string"/>
    <xs:element name="registered" type="xs:string"/>
  </xs:sequence>
</xs:complexType>

</xs:element> 

</xs:schema>