Creating Forms with ReactJS

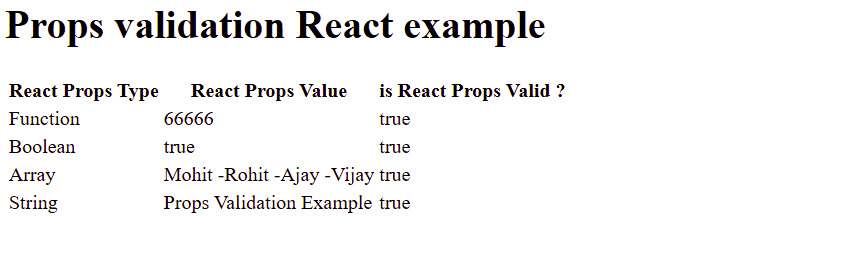
The tutorial provides the usage of Forms in React Application, Forms control inputs, Forms using Controlled component in React, Forms using Uncontrolled component in React, Difference between controlled and uncontrolled component in React, Forms examples in React.

What is Forms in React ?

Forms are the control inputs like text fields, buttons, checkbox, radio button, etc to develop the front end for any web based application using React. The data captured in the React Forms is managed by the React Components and application operations can be performed.

Forms Type in React

The Forms can be classified in below given categories

  • Forms using Uncontrolled component: The data change is handled as the traditional HTML form inputs where the form change is handled by the DOM itself. The uncontrolled components requires the ref to read the values from the DOM structure.
  • Forms using Controlled component: The data change in the form is handled by the controlled components in React instead using the event-based callbacks of handled by DOM as the traditional approach which allows react to provide stateful and interactive approach. The state within the component is updated using the setState() method

Difference between Controlled Component Vs Uncontrolled Component

Controlled component in ReactUncontrolled Component in React
Controlled component maintain the stateUncontrolled component does not maintain state
Form data is handled by the Parent componentForm data is handled by the DOM itself
Retrieves the current value using propsRetrieves the current value using ref from the DOM
allows to perform validationsvalidations cannot be performed

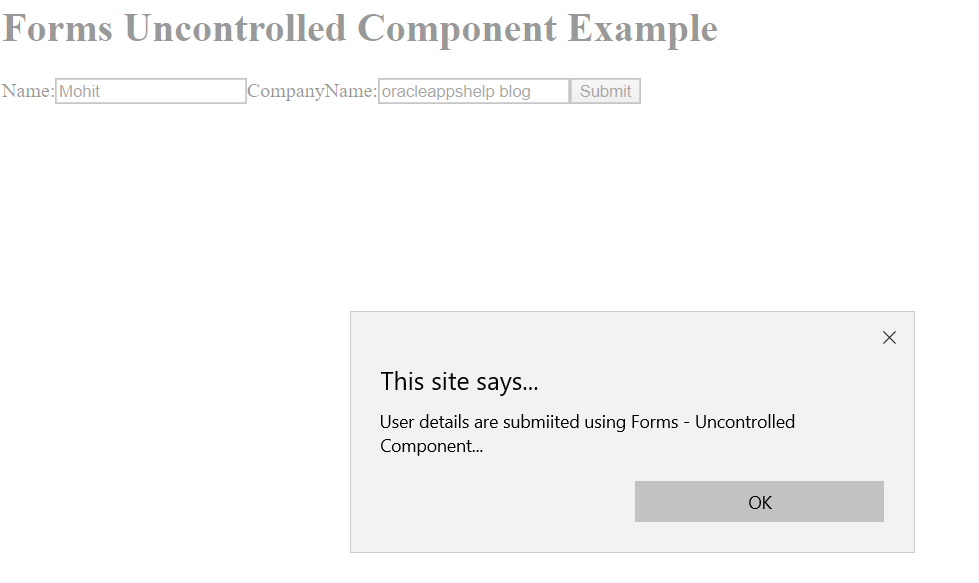
Forms Example using uncontrolled component in React

import React, { Component } from 'react';
class App extends React.Component {
  constructor(props) {
      super(props);
      this.updateSubmit = this.updateSubmit.bind(this);
      this.input = React.createRef();
  }
  updateSubmit(event) {
      alert('User details are submiited using Forms - Uncontrolled Component...');
      event.preventDefault();
  }
  render() {
    return (
      <form onSubmit={this.updateSubmit}>
        <h1>Forms Uncontrolled Component Example</h1>
        <label>Name:
            <input type="text" ref={this.input} />
        </label>
        <label>
            CompanyName:
            <input type="text" ref={this.input} />
        </label>
        <input type="submit" value="Submit" />
      </form>
    );
  }
}
export default App;
Response for Forms Uncontrolled Component

Forms Example using controlled component in React

import React, { Component } from 'react';
class App extends React.Component {
  constructor(props) {
      super(props);
      this.state = {
        username: "Mohit",
        emailid: "mohitatgmaildotcom"
      };
      this.handleSubmit = this.handleSubmit.bind(this);
      this.handleInputChange = this.handleInputChange.bind(this);
    }
    handleInputChange(event) {
      const target = event.target;
      const value = target.name === 'username' ? target.checked : target.value;
      const name = target.name;
      this.setState({
        [username]: value
      });
    }
    handleSubmit(event) {
      alert('User informaiton is submitted successfully: ');
        event.preventDefault();
    }
  render() {
    return (
      <form onSubmit={this.handleSubmit}>
        <h1>Uncontrolled Form Example</h1>
        <label>Name:
            <input  name="username" type="text"  value={this.state.username} onChange={this.handleInputChange}/>
        </label>
        <label>
            Email Id:
            <input name="emailid" type="text" value={this.state.emailid}  onChange={this.handleInputChange}/>
        </label>
        <label>
            Job Type:
            <select name="jobtype" onChange={this.handleInputChange}>
              <option value="IT Enginner">IT Enginner</option>
              <option selected value="IT Architect">IT Architect</option>
              <option value="IT Manager">IT Manage</option>
              <option value="IT Director">IT Director</option>
            </select>
        </label>
        <input type="submit" value="Submit" />
      </form>
    );
  }
}
export default App;

ReactJS Tutorial on Props validation with examples

The tutorial provides the detail on the usage of props in the React application, How to define default Props, Props example, State and Props Example.

What is Props in React ?

Props in React are similar to properties which are read-only and are passed as argument within the component. It acts as the function arguments and allows to share data among components. Props are immutable as we cannot modify the values of props within the component. Thus , it is preferred to define the components with the State which can be updated with the change in the component.

The attributes in the component can be accessed using this.props and use render( ) method to render dynamic data among the components.

Example – the below example in App.js read the value from props attribute which is being pass from Main.js using reactDOM.render( ) method.

import React, { Component } from 'react';
class App extends React.Component {
   render() {
      return (
          <div>
            <h1> Hello All , Oracleappshelp.com Admin Name is : { this.props.admin } </h1>
            <p> <h4> This the simple example of  using props in React</h4> </p>          
          </div>
      );
   }
}
export default App;
import React from 'react';
import ReactDOM from 'react-dom';
import App from './App.js';
ReactDOM.render(<App admin="Mohit Sharma" />, document.getElementById('app'));
Response for Props example

Defining Default Props in the component

We have seen how to pass the props using the reactDOM.render( ) method but props can also be defined as default within the component. The below example shows how component can read the default props value.

import React, { Component } from 'react';
class App extends React.Component {
   render() {
      return (
          <div>
              <h1>Define Default Props in React Component</h1>
            <h3>Hello All, Oracleappshelp.com admin name is  {this.props.admin}</h3>
            <h3>His hobby is  {this.props.hobby}</h3>
            <p>Another props example with the usage of default props value</p>
          </div>
        );
    }
}
App.defaultProps = {
   admin: "Mohit Sharma",
   hobby: "blogging"
}
export default App;
import React from 'react';
import ReactDOM from 'react-dom';
import App from './App.js';
ReactDOM.render(<App />, document.getElementById('app'));
Response for default props example

State and Props Example

We have seen the example for using State and Props separately. The below given example provide the usage of both State and Props. The State has been defined in the Parent Component using Constructor and passing the value to the child components using props.

import React from 'react';
class App extends React.Component {
   constructor(props) {
      super(props);
      this.state = {
         employee: "employee props vlaue is read.",
         department: "department props vlaue is read."
      }
   }
   render() {
      return (
         <div>
            <Header employeeProp = {this.state.employee}/>
            <Content departmentProp = {this.state.department}/>
         </div>
      );
   }
}
class Employee extends React.Component {
   render() {
      return (
         <div>
            <h1>{this.props.employeeProp}</h1>
         </div>
      );
   }
}
class Department extends React.Component {
   render() {
      return (
         <div>
            <h2>{this.props.departmentProp}</h2>
         </div>
      );
   }
}
export default App;
Response for State and Props Example

Props Validation in React

Props Validation is the process to ensure that the defined props values are correctly mapped with the attributes as per the definition. This helps in avoiding application issues at the run-time and validate the drill down value for each component being used.

The below given are the validators which can be used while defining props in React Application.

React Props TypeReact Props Type Description
PropTypes.number props defined as an number
PropTypes.object props defined as an object
PropTypes. array props defined as an array
PropTypes. func props defined as a function
PropTypes. any props defined with any data type
PropTypes. bool props defined with boolean type
PropTypes.string props defined as string
PropTypes.symbol props defined as symbol
PropTypes.element props defined as an element
PropTypes.node props defined as the node
PropTypes.oneOf() props defined as one of several types of values
PropTypes.instanceOf props defined as an instance of a particular JavaScript class
PropTypes.isRequired defined props must be provided
PropTypes.oneOfType([PropTypes.
string,PropTypes.number])
props can render anything: numbers, strings, elements or an array
import React, { Component } from 'react';
import PropTypes from 'prop-types';
class App extends React.Component {
   render() {
      return (
          <div>
              <h1>Props validation React example</h1>
              <table>
                  <tr>
                      <th>React Props Type</th>
                      <th>React Props Value</th>
                      <th>is React Props Valid ?</th>
                  </tr>
                  <tr>
                      <td>Function</td>
                      <td>{this.props.propFunc(12345)}</td>
                      <td>{this.props.propFunc(12345) ? "true" : "False"}</td>
                  </tr>
                  <tr>
                      <td>Boolean</td>
                      <td>{this.props.propBool ? "true" : "False"}</td>
                      <td>{this.props.propBool ? "true" : "False"}</td>
                  </tr>
                  <tr>
                        <td>Array</td>
                        <td>{this.props.propArray}</td>
                        <td>{this.props.propArray ? "true" : "False"}</td>
                    </tr>
                  <tr>
                      <td>String</td>
                      <td>{this.props.propString}</td>
                      <td>{this.props.propString ? "true" : "False"}</td>
                  </tr>
             </table>
        </div>
        );
   }
}
App.propTypes = {
    propArray: PropTypes.array.isRequired,
    propBool: PropTypes.bool.isRequired,
    propFunc: PropTypes.func,
    propString: PropTypes.string,
}
App.defaultProps = {
    propArray: ['Mohit -','Rohit -','Ajay -','Vijay'],
    propBool: true,
    propFunc: function(sum){return sum+54321},
    propString: "Props Validation Example",
}
export default App;
Response for Props Validation example

Stateful and Stateless State example in React

The tutorial provides the insight on the usage of State in ReactJS, Stateful state and Stateless state , state syntax and state examples using React.

What is State in React ?

The State is used to contain data or related information about the component in React and determines the component behavior and depicts how the data is rendered to the DOM Structure. The usage of State makes the component more dynamic and interactive.

State methods in React

The State in the component can be set by invoking the setState( ) method. To retrieve the initial state in the component, use getInitialState( ). The State can be accessed or modified within the component or sometime by the component itself.

Stateful State example in React

We need to create the constructor to be assigned with the initial state value. The defined state in the component can be accessed using this.state inside the render( ) method. The below code checks for the status value and toggle the display message. Currently the value for status is set to true . The value of state is being set using the super() in the constructor.

import React, { Component } from 'react';
class App extends React.Component {
 constructor() {
      super();
      this.state = { status: true};
      }
      render() {
          const displayMessage = this.state.status ? (
              <div>
                  <p><h3>The Application status is now - Completed.</h3></p>
            </div>
              ) :  (
                  <div>
                      <p><h3>The Application status is currently - Inprogress.</h3></p>
                </div>
                  ) ;
              return (
                  <div>
                      <h1> Welcome to Demo Application </h1>
                      { displayMessage }
                  </div>
              );
     }
}
export default App;

The Ouptut message should be:

” The Application Status is currently – completed”

Now if we change the value of status to false and rerun the application, the other message will be shown ” The Application Status is currently – Inprogress”

Response message for stateful state

How to create React Component

The tutorial provides the insight on the usage of React components. The traditional methodologies ends up with the lengthy code piece which becomes difficult to maintain and requires more effort in case of bug fixing.

In the traditional approach, where the develop components when updated it required the traversal of the complete DOM Tree to find the DOM element which needs to be updated and thus makes the DOM Manipulation as an expensive action.

What is React component ?

With React Components, the complex code piece is divided into small JavaScript Functions termed as “components” which results into independent , reusable , isolated code with ease of maintainability.

With React JS Library, the React JS Components uses the Virtual DOM which provides the abstraction of the actual DOM where components are represented as nodes. Through React JS library we can now update the Virtual DOM by updating the component itself and thus avoid complete DOM Tree traversal which makes it performance oriented.

The components (which are usually JavaScript functions) accepts inputs called as “props” and in return provides the React elements as the view output. The components can be classified as:

  • Functional components (use of function as component)
  • Class Components (use of class as component)

How to create a React JS Component ?

The below given is the simple React JS App.js file where

App– is the component name , should be given with Pascal Casing

render() – is the method used to render the component elements

React.createElement – helps in creating the javaScript element

h1 – represents the HTML element

import React from 'react';   
class App extends React.Component { 
    render() {
        return React.createElement("h1", {}, "Hello World!!!");
    }
}
export default App;

Functional Component example

Let’s see the simple example where function acts as the component

function greetUser(props) {
  return <h1>Hello, {props.name}</h1>;
}
const element = <greetUser name="Mohit Sharma" />;
ReactDOM.render(
  element,
  document.getElementById('root')
);
  • ReactDOM.Render() includes the element with the greetUser()
  • React invokes the greetUser() where name is passed as props.
  • React reads the props value
  • React returns the complete string within heading as ‘<h1>Hello, Mohit Sharma </h1>’
  • React updates the DOM Structure

Class Component example

Let’s see the simple example where class acts as the component.

import React, { Component } from 'react';  
class App extends React.Component {  
   render() {  
      return (  
         <div>  
            <HeaderClass/>  
            <ContentClas/>  
         </div>  
      );  
   }  
}  
class HeaderClass extends React.Component {  
   render() {  
      return (  
         <div>  
            <h1>Welcome to Oracleappshelp .Enhance your knowledge...</h1>  
         </div>  
      );  
   }  
}  
class ContentClas extends React.Component {  
   render() {  
      return (  
         <div>  
            <h2>Oracle and Open Source Technology Blog</h2>  
            <p>do let us know anout your feedback to improve our technology blogs</p>  
         </div>  
      );  
   }  
}  
export default App;  

ReactJS – JSX features

The tutorial provides the detailing about the React JSX (JavaScript Extension) and its features.

What is React JSX ?

The JSX feature in React programming provides the extension to JavaScript which helps in converting the HTML tags to the react elements and provides the mix of HTML and JavaScript together. React JSX provides the template script instead of using regular JavaScript.

In other words, the render functions of React provides the HTML like syntax used by React to extend the ECMAScript to allow HTML like syntax to be used with JavaScript and React.

JSX Example

The below given is the sample code for JSX.

<div> Hello Oracleappshelp Users </div>

The normal HTML tags provided below is converted to react element which includes the div tag, argument passed and content value.

React.createElement("div", null, "Hello Oracleappshelp Users"); 

If we refer our previous code for App.js in the React JS Overview blog, then that shows the mix of React and HTML Tags together

import React, { Component } from 'react';
class App extends Component{
   render(){
      return(
         <div>
            <h1>Hello Oracleappshelp Users</h1>
         </div>
      );
   }
}
export default App;

Let’s consider another example of create React Component for the Login Page with UserName and Password

Normal JavaScript usage for creating React JS Component for Login Form

class App extends React.Component{
         render(){
                  return (
                          React.createElement('form', {},
                          React.createElement("h1", {}, "Login"),
                          React.createElement('input', {type: 'text',placeholder:'Name', value: '',}),
                          React.createElement('br', {}),React.createElement('br', {}), 
                          React.createElement('input', {type: 'password', placeholder: 'password',
                                               value: '',}), 
                          React.createElement('br', {}), React.createElement('br', {}), 
                          React.createElement('button', {type: 'submit'}, "Login"))
                         )
                }
};
 ReactDOM.render(<App />, document.getElementById('root'));                         
export default App;

JSX usage for creating React JS Component for Login Form

class App extends React.Component{
              render(){
                       return (<form><h2>Login</h2>
                                     <input type="text" placeholder="Name" /><br/><br/>
                                     <input type="password" placeholder="password" /> <br/><br/>
                                     <input type="submit" nvalue="log" />                 
                                </form>);
                       }
};
export default App;

Advantages of using JSX

  • The JSX templating provides the optimization to the react code and thus makes it perform faster
  • React overcomes the usage of code logic and markup languages separately with the usage React components which helps in combining the both.
  • JSX is type -safe and thus avoid errors at the run -time
  • JSX provides easier way to create templates.

Nested elements in JSX

With the usage of JSX , it is feasible to return multiple elements within the same container. The below given simple example demonstrate the same.

import React, { Component } from 'react';  
class App extends Component{  
   render(){  
      return(  
         <div>  
            <h1>Oracleappshelp Tutorials</h1>  
            <h2>Oracle and Open Source Technology Blog</h2>  
            <p>The Oracleappshelp pupose to help the community in learning new technologies and providing easy step by step tutorials</p>  
         </div>  
      );  
   }  
}  
export default App;

JSX Attributes

The below points need to be considered for the JSX Attributes

  • JSX allows attribute to be used with the HTML elements
  • JSX allows custom attributes to be created
  • JSX uses camelCase naming convention for the attributes. Thus, class in HTML becomes className in JSX, for in HTML becomes htmlFor in JSX
  • Syntax for using custom attribute is data-prefix

The below given example demonstrates the use of JSX Attributes

import React, { Component } from 'react';  
class App extends Component{  
   render(){  
      return(  
         <div>  
            <h1>Oracleappshelp Tutorials</h1>  
            <h2>Oracle and Open Source Technology Blog</h2>  
            <p data-customAttribute = "custom">The Oracleappshelp pupose to help the community in learning new technologies and providing easy step by step tutorials</p>  
         </div>  
      );  
   }  
}  
export default App;

JavaScript expressions in JSX

JSX also provides the use of JavaScript expressions. The use of curly brackets {} allows to provide the expressions that need to be evaluated. The below given example demonstrates the use of JSX JavaScript expressions

import React, { Component } from 'react';  
class App extends Component{  
   render(){  
      return(  
         <div>  
            <h1 style ={customeStyle}>{12345 + 54321}</h1>  
           {/* JSX allow to enter the comments in this way within the curly brackets */}  
         </div>  
      );  
   }  
}  
export default App;

Ternary expression in JSX

JSX does not support if else conditions but allows to enter the ternary expressions for the evaluation of the condition at the run-time. The below given is the simple example with the usage of ternary expressions.

import React from 'react';
class App extends React.Component {
   render() {
      var value = 100;
      return (
         <div>
            <h1>{value < 100 ? 'True!' : 'False'}</h1>
         </div>
      );
   }
}
export default App;

JSX Comments

Comments can be added in the JSX using the /* and */ within the curly brackets. Refer the above example with the comments added using JavaScript expressions

JSX Styling

React provides the inline style using the camelCase syntax. Syntax for using custom style is style ={customStyle} Refer the above example with the style added using JavaScript expressions

ReactJS Tutorial – Environment Setup

The tutorial provides the step by step installation process for installing React . The prerequisite for installing React is the node.js installation. The tutorial for node.js can be referred here node.js installation steps

React Installation approaches:

  1. React Installation using create-react-app command
  2. React Installation using webpack and babel with npm commands

React installation using webpack and Babel

React can be installed using the webpack and babel . webpack is the module bundler which helps in installing and managing independent modules and provides as a single file bundle for the compilation.

Babel is a JavaScript compiler and transpiler which helps in providing ES6 features and also converts one source code to another.

Below given are the installation steps for React using webpack

Create the folder “reactApp” which will contain the required installation files for developing React application.

C:>mkdir reactApp
C:>cd reactApp

Each Reach application, requires package.json file which can be cretaed using the below given init command. Provide the required information for the description, package name, git repository , keywords, author, etc

C:\reactApp>npm init

install react using webpack and babel

You can also execute the below command which creates the package.json file with the default values.

C:\reactApp>npm init -y

init -y comamnd for creating package.json file

Now execute the below npm commands for installing the React modules

C:\reactApp>npm install react –save
C:\reactApp>npm install react-dom –save

React modules can be installed using the single command as given below

C:\reactApp>npm install react react-dom –save

install react using npm command

install react dom using npm command

The below commands are to be executed to install the webpack using npm command

C:\reactApp>npm install webpack –save
C:\reactApp>npm install webpack-dev-server –save
C:\reactApp>npm install webpack-cli –save

install webpack using npm command

install webpack using npm command

install webpack dev server using npm command

install webpack dev server using npm command

install web cli using npm command

install web cli using npm command

install babel using npm command

The below commands are to be executed to install babel using the npm command

C:\reactApp>npm install babel-core –save
C:\reactApp>npm install babel-loader –save
C:\reactApp>npm install babel-preset-env –save
C:\reactApp>npm install babel-preset-react –save
C:\reactApp>npm install html-webpack-plugin –save

The babel can be installed using the single line command as given below

C:\reactApp>npm install babel-core babel-loader babel-preset-env babel-preset-react html-webpack-plugin –save

install babel core using npm command
install babel loader using npm command
install babel preset environment using npm command
install babel preset react using npm command
install html webpack plugin using npm command

The below given files need to be created as part of the installation process to be used by the React application.
C:\reactApp>type nul > index.html
C:\reactApp>type nul > App.js
C:\reactApp>type nul > main.js
C:\reactApp>type nul > webpack.config.js
C:\reactApp>type nul > .babelrc

react related config files

webpack.config.js file modifications

const path = require('path');
const HtmlWebpackPlugin = require('html-webpack-plugin');
module.exports = {
   entry: './main.js',
   output: {
      path: path.join(__dirname, '/bundle'),
      filename: 'index_bundle.js'
   },
   devServer: {
      inline: true,
      port: 8001
   },
   module: {
      rules: [
         {
            test: /\.jsx?$/,
            exclude: /node_modules/,
            loader: 'babel-loader',
            query: {
               presets: ['es2015', 'react']
            }
         }
      ]
   },
   plugins:[
      new HtmlWebpackPlugin({
         template: './index.html'
      })
   ]
}

Remove the below given command from the scripts object if developer needs to work on the development activities and application testing is not required initially.

“test”: “echo \”Error: no test specified\” && exit 1″

Instead add the below given commands for the start and build commands

“start”: “webpack-dev-server –mode development –open –hot”,
“build”: “webpack –mode production”

react installation using react-create-app command

React Installation can be done using the create-react-app command. The below given command creates the folder with name “myreact-app” and all required files are installed in the folder

install react using create-react-app command

Delete the source files

C:\Users\user\Desktop>cd myreact-app/src

C:\Users\user\Desktop> cd myreact-app\src>del * 

Add index.js and index.css file to the source folder

 C:\Users\user\Desktop>cd myreact-app\src> type nul > index.js  
C:\Users\user\Desktop>cd myreact-app\src> type nul > index.css

Add the below code lines to index.js file

import React from 'react';
import ReactDOM from 'react-dom';
import './index.css';

Common Errors while installing React using Webpack and Babel

  1. Failed to build the babel loader

This happens when the React uses the higher version to run the babel loader .

Run the babel loader command with the higher version

C:\reactApp>npm install babel-loader@8 --save-dev
error while running the React Application after installation

2. When babel core library fails due to babel loader incompatibility

You need to install the babel loader 7 version as per the below given error

App>npm install babel-loader@7 --save-dev
babel loader incompatible version

3. Error- couldn’t find preset “es2015” relative to directory

This means installation for “es205” is not on the machine. Execute the below command

npm install babel-preset-es2015

Common Errors while installing React using create-react-app

Ensure that your NPM version is 5 or above

core-js contains post install script which perfomrs the process via node -e call. It requires shell script which could be at different install path and thus fails. To resolve the issue , Execute the below command
npm config set script-shell “C:\Program Files\git\bin\bash.exe”
Now, re-run the create-react-app command for the React Installation

Creating First React Application

Let’s try our first “Hello World’ React Application.

  • Open the index.html file and add the below given code.
  • Define the root element div id =”app”
  • Script object allows to map the bundled app file.
<!DOCTYPE html>
<html lang = "en">
   <head>
      <meta charset = "UTF-8">
      <title>React App</title>
   </head>
   <body>
      <div id = "app"></div>
      <script src = 'index_bundle.js'></script>
   </body>
</html>
  • Open the App.js file and add the below code
import React, { Component } from 'react';
class App extends Component{
   render(){
      return(
         <div>
            <h1>Hello Oracleappshelp Users</h1>
         </div>
      );
   }
}
export default App;
  • Open the main.js and add the below code. The Class HelloWorldApp needs to be mapped as the component in the main.js as the App Element.
import React from 'react';
import ReactDOM from 'react-dom';
import HelloWorldApp from './App.js';
ReactDOM.render(<App />, document.getElementById('app'));

Execute React application

Run the command – npm start and you will be provided with the below details for the code compilation

Run React sample application

ReactJS Overview & features

The blog provides the ReactJS Overview , what is ReactJS, ReactJS features, ReactJS advantages and ReactJS limitations 

Features of ReactJS

Below given are the features of ReactJS which makes it one of the most popular java script library.

ReactJS Feature NameReactJS Feature Description
License React is licensed under Facebook Inc. (CC BY 4.0) and made it available
to public in May 2013.
DeclarativeReact is declarative and allows to develop interactive UIs
JSXJSX (JavaScript XML) is an extenstion to javascript which allows to write
and add HTML elements into react. JSX Converts HTML tags into react
elements.
ComponentsReact provides component based javascript library which allows to split the code logic into small javascript functions maintaining the state and props and provides reusability.
Virtual DOMReact provides in-memory data structure termed as “Virtual DOM” to provide faster execution by updating the changed DOM Structure only instead of reloading complete DOM
Javascript expressionsprovides support for javascript expressions
SEO PerformanceReact JS library helps in developing isomorphic applications using the server side rendering concept which increases the overall SEO performance.

Advantages of ReactJS

  1. React is an open source java script library and easy to learn supported with good documentation.
  2. Provide development of Rich UI features for both web based and mobile applications.
  3. React is declarative and efficient
  4. Provide easy code maintainability and reusable code with the usage of components feature.
  5. React provides faster application execution with the use of Virtual DOM approach
  6. Provide easy debugging as code is developed using java script.
  7. React provides statefull components with the usage of state and props
  8. React provides easy integration with the external plugins.

Disadvantages of ReactJS

  • Frequent changes in the ReactJS library makes it difficult for developers to keep upgrading with the features and makes it a on -going learning experience.
  • ReactJS covers the “View” part as part of the MVC Architecture and thus need to integrate with other frameworks for application development.
  • JSX being an extension to java script provides the conversion of html tags to react elements and this somehow makes it difficult for developers to understand the react functionality.

enum java type

Enum is provided as a new data type to provide the predefined values (constants) for a variable. The Enum data type is defined in java using the enum keyword. The enum data type fields are in uppercase letters being constant values.

The enum data types can be helpful in supporting the different values for a particular attribute . For instance , an application goes through the life cycle and maintains differnet values for each user action which results into the change of the status for the application. So, we can have the enum data type for the application status as given below:

public enum Status {

INPROGRESS,UPDATED,PENDING_FOR_APPROVAL,APPROVED,ERROR,RE_PROCESSED

}

difference between enum data type and constants in java

1, The enum data type is type Safe and provides limited set of values

2. The enum data type proivdes the listing of all constants in the predefined enum data type whereas constans store single values and thus requires as many of constants as the values to be maintained

public enum Status {

INPROGRESS,UPDATED //enum data type values

}

public static final String INPROGRESS = “INPROGRESS”; //constant value
public static final String UPDATED = “UPDATED”; //constant value

java enum data type example

The below java program provides the usage of enum ApplicationStatus to get the different statuses from the enum data type.

package core.java.oracleappshelp.basics;
public class StatusEnumExample {
public enum ApplicationStatus{
	INPROGRESS,UPDATED,PENDING_FOR_APPROVAL,APPROVED,ERROR,RE_PROCESSED
}
    public void ValidateStatus(String ApplicationStatus) {
        switch (ApplicationStatus) {
            case "INPROGRESS":
                System.out.println("Application Status is changed to INPROGRESS.");
                break;
                    
            case "UPDATED":
            	System.out.println("Application Status is changed to UPDATED.");
                break;
                         
            case "PENDING_FOR_APPROVAL": 
            	System.out.println("Application Status is changed to PENDING_FOR_APPROVAL.");
                break;
            case "APPROVED":
            	System.out.println("Application Status is changed to APPROVED.");
                break;
                    
            case "ERROR":
            	System.out.println("Application Status is changed to ERROR.");
                break;
                         
            case "RE_PROCESSED": 
            	System.out.println("Application Status is changed to RE_PROCESSED.");
                break;      
                
            default:
                System.out.println("Application Status value cannot be evaluated.....");
                break;
        }
    }
    
    public static void main(String[] args) {
    	StatusEnumExample status = new StatusEnumExample();
    	status.ValidateStatus("INPROGRESS");
    	status.ValidateStatus("UPDATED");
    	status.ValidateStatus("PENDING_FOR_APPROVAL");
    	status.ValidateStatus("APPROVED");
    	status.ValidateStatus("ERROR");
    	status.ValidateStatus("RE_PROCESSED");
    	
    }
}

java enum data type program output:

Application Status is changed to INPROGRESS.
Application Status is changed to UPDATED.
Application Status is changed to PENDING_FOR_APPROVAL.
Application Status is changed to APPROVED.
Application Status is changed to ERROR.
Application Status is changed to RE_PROCESSED.

package core.java.oracleappshelp.basics;
public class StatusEnumExample {
public enum ApplicationStatus{
	INPROGRESS,UPDATED,PENDING_FOR_APPROVAL,APPROVED,ERROR,RE_PROCESSED
}
   public static void main(String[] args) {
    	StatusEnumExample status = new StatusEnumExample();
    	//printing all the values of application status enum 
         ApplicationStatus  statusEnum[] = ApplicationStatus.values();
        System.out.println("Value of application status enum : ");
        for(ApplicationStatus statusValue: statusEnum) {
           System.out.println(statusValue);
        }
    	
    }
}

Java program output:

Value of application status enum :
INPROGRESS
UPDATED
PENDING_FOR_APPROVAL
APPROVED
ERROR
RE_PROCESSED

Java Enumeration Interface

The java.util package provides the Enumeration class which implements the Enum Interface. The below given is the example for the Vector using Enumeration usage.

package core.java.oracleappshelp.basics;
import java.util.Enumeration;
import java.util.Vector;
public class EnumerationExample {
	 public static void main(String args[]) {
	      //instantiating a Vector
	      Vector<String> vec = new Vector<String>( );
	      //Populating the vector
	      vec.add("INPROGRESS");
	      vec.add("UPDATED");
	      vec.add("PENDING_FOR_APPROVAL");
	      vec.add("APPROVED");
	      vec.add("ERROR");
	      vec.add("RE_PROCESSED");
	      //Retrieving the elements using the Enumeration
	      Enumeration<String> status = vec.elements();
	      while(status.hasMoreElements()) {
	         System.out.println(status.nextElement());
	      }
	   }
}

Java enumeration program implementation using vector:

INPROGRESS
UPDATED
PENDING_FOR_APPROVAL
APPROVED
ERROR
RE_PROCESSED

Interface class in java

The Tutorial discuss about the interface class in Java. The interface class in java is one of the core concept of the java programming language and supports the object oriented approach. The java collections, java design patterns, java List uses the implementation of interface classes. The Java Abstract Class provides the partial abstraction mechanism whereas Interface class implements the complete abstraction mechanism.

What is interface class in java ?

The java interface class is declared using the keyword ‘interface’. The java Interface class provides the complete abstraction by providing all the abstract methods for the implementation. With the addition of new features in Java 8 , interface class also provides static methods ( defined with static modifier) and default methods( defined with default modifier) now. Interface class also provides the declaration of constants. Constant values can be defined as public , static and final.

The Java interface class can extends interface or multiple interfaces but cannot extend the class which also concludes that the Java interface class cannot be instantiated but used by other class(es) for the abstract method implementation.

Java Interface Class Signature

The interface class signature includes:

  • The keyword interface,
  • name for the interface class ,
  • parent interfaces (if any) and
  • the interface body ( contains abstract methods, default methods, static methods)

Points to consider while using Java Interface class

  • The java interface class is declared using the keyword ‘interface’
  • The java interface class can extends interface or multiple interfaces but cannot extend the class
  • Java interface class cannot be instantiated
  • Java interface class provides complete abstractions as all abstract methods are without body.
  • Java interface class does not support constructors
  • The sub class requires implements keyword to implement the interface
  • The attribute of the interface is public , static and final by default
  • The abstract methods are by default implicitly abstract and public.

Java interface class example

Lets create an java interface class VehicleInterface.java with abstract methods and then Toyota.java implements the interface.

package core.java.oracleappshelp.basics;
public interface  VehicleInterface {
	
	    //create the interface method
		public abstract void getEnginePower(int enginePower);
		
		//create the interface  method
		public abstract void getVehicleModel(String model);
}
package core.java.oracleappshelp.basics;
public class Toyota implements VehicleInterface{
	private int engineCC;
	private String model;
	
	public Toyota() {
		System.out.println( "This is the implementation class for VehicleInterface");
	}
	@Override
	public void getEnginePower(int enginePower) {
		// TODO Auto-generated method stub
		this.engineCC =enginePower;
		System.out.println( "Toyota Engine Power is="+this.engineCC + "\n");
		
		
	}
	@Override
	public void getVehicleModel(String model) {
		// TODO Auto-generated method stub
		this.model =model;
		System.out.println( "Toyota Model is ="+ this.model);
		
	}
	
		public static void main(String args[]){
		Toyota vehicle = new Toyota();
		vehicle.getVehicleModel("Camry ZX");
		vehicle.getEnginePower(1200);
		}
		
}

Java interface program output:

This is the implementation class for VehicleInterface
Toyota Model is =Camry ZX
Toyota Engine Power is=1200

Core Java Tutorial on Abstract class

The tutorial provides the detailing about the creation and usage of abstract class in java. The java abstract class is declared using the keyword’ abstract’ . The abstract class could have methods with or without implementation. The abstract classes cannot be initiated as they could have unimplemented methods but these abstract classes can be sub-classed.

abstract class usage in java

The below given is the abstract method which is declared but not implemented

abstract void model(String carModel);

abstract void engineCapacity(int cc);

The class using the abstract methods should also be declared as abstract class

public abstract class Car {

// declare class variables

//declare non-abstract methods (which includes implementation)

abstract void model(String carModel);

abstract void engineCapacity(int cc);

}

Points to Consider for creating java abstract class

  • Java abstract class are required to be declared with “abstract” keyword
  • Java abstract class cannot be initiated
  • Java abstract class contains abstract method with or without body.
  • Java abstract does not always require to have abstract methods even though it is being defined as an abstract class
  • The sub class of the java abstract class must implement all abstract methods.
  • Interfaces methods are implicitly abstract unless they are static or default. (https://docs.oracle.com/javase/tutorial/java/IandI/interfaceDef.html )

How java abstract class is different from interface class ?

The java abstract class is similar to Interface except the difference that the class which implements the interface must implement all of the interface methods whereas if we need the class which does not require to implement all the methods then the class with methods should be declared as ‘abstract’.

Java abstract class example

Lets consider the example of Vehicles where vehicles could be of different model and having different engine power. so the below abstract class Vehicle is created where the engine

package core.java.oracleappshelp.basics;
//abstract class example
public abstract class Vehicle {
	
	private String vehicleName;
	//private String vehicleModel;
	
	public Vehicle(String name){
		this.vehicleName=name;
		//this.vehicleModel=model;
	}
	
	//create the abstract method
	public abstract void getEnginePower(int enginePower);
	
	//create the abstract method
	public abstract void getVehicleModel(String model);
	
	@Override
	public String toString(){
		return "Vehicle Name="+this.vehicleName;
	}
}
package core.java.oracleappshelp.basics;
public class VehicleEngine extends Vehicle {
	
	private int engineCC;
	private String name;
	private String model;
	
	public VehicleEngine(String name) {
		super(name);
		this.name = name;
		
	}
	@Override
	public void getEnginePower(int enginePower) {
		if(enginePower == 0){
			System.out.println("The Engine CC details are not provided");
		}else{
			this.engineCC =enginePower;
			System.out.println( "Vehicle Engine Power is="+this.engineCC + "\n");
		}
	}
	
	@Override
	public void getVehicleModel(String model) {
		if(model == null){
			System.out.println("The Engine model  details are not provided");
		}else{
			this.model =model;
			System.out.println( "Vehicle Name="+ this.name);
			System.out.println( "Vehicle Model="+this.model );
		}
	}
	
	public static void main(String args[]){
		Vehicle vehicle = new VehicleEngine("Maruti");
		vehicle.getVehicleModel("Maruti Suzuki ZX");
		vehicle.getEnginePower(900);
		
		Vehicle vehicle2 = new VehicleEngine("Toyota");
		vehicle2.getVehicleModel("Camry");
		vehicle2.getEnginePower(1200);
		
		
	}
}
Vehicle Name=Maruti
Vehicle Model=Maruti Suzuki ZX
Vehicle Engine Power is=900
Vehicle Name=Toyota
Vehicle Model=Camry
Vehicle Engine Power is=1200

Apache Maven Tutorial

The Apache Maven tutorial provides the basic and advanced concepts of Apache Maven. The Apache Maven tutorial is for the developers, beginners and professionals to understand the overall build and dependency process during project development.

Project development goes through various process like coding, build, deployment , testing before it is being developed completely to be deployed into production. The build and deployment process is a tedious and time consuming process and requires tasks such as adding library dependencies, additional project jars on the project class path, code compilation and fixing compilation issues, deploying compiled artifacts to the environment as JAR, WAR, EAR files. Apache Maven automates the above mentioned tasks and helps in reducing the overall deployment process, minimizing human errors and separates it as an activity than code development process.

Apache Maven is a powerful project management and build tool which is based on Project Object Model (POM) and is used for project build, project dependency and documentation. Project Object Model is used as pom.xml in the project which contains project and configuration information used by maven to build the project dependencies, build directory, source directory, managing project class path, managing file extensions, etc.

Benefits of using Apache Maven as the build tool

The Apache Maven is a similar tool like ANT but it provides additional features which makes it more common choice for the developers. The below are the advantages of apache maven:

  • Simplifies the Project Setup: Apache Maven provides project templates named archetypes which simplifies the project configuration process.
  • Manages Dependency Management: Automates the validation and compatibility process and manages the dependencies for the project.
  • Project Dependencies: Apache Maven retrieves the project dependencies from the dependency repositories
  • Plug-in Dependencies: Apache Maven retrieves the plug-in dependencies from the plugin repositories
  • Central Repository System: Apache Maven using the Central Repository System for public repositories

Thus , we can say that Apache Maven is a project management and build tool and helps in managing the below:

  • Build
  • Dependencies
  • Documentation
  • Releases
  • Distribution
  • Reporting
  • SCMs

Difference between Ant and Maven

The below given are the primarily difference between the ANT and Maven.

  • Project Structure details are required to be provided when using ANT as the build tool, whereas it is not required while using Maven. It uses the project templates called archetypes for project configuration.
  • Developers need to defined the ordering of steps (makes ANT a procedural approach) to be executed through ANT build whereas Maven is declarative and executes build based on configuration defined in pom.xml file.
  • ANT build doesn’t follow any life cycle whereas Maven processes the defined life cycle.
  • ANT is more as a build tool whereas Maven is a Framework which includes project management and build processes.
  • ANT scripts are project specific and cannot be resused whereas Maven is declarative and can be reused.

Apache Maven Life cycle

The Apache Maven used the Build Life cycle to clearly define the process for building and distributing the project artifacts. The below given are the build life cycles for the maven

  1. Default: manages the project deployment process
  2. Clean: manages the project cleaning process
  3. Site: manages the project documentation

Apache Maven build life cycle phases

The Maven build life cycle goes through various phases which are given below:

  • Validate: validates the project related information
  • Compile:helps in compiling the source code of the project
  • Test: validating the compiled source code using unit testing framework
  • Package:converts the compiled source code into distribution format like JAR, WAR, EAR files
  • Verify: executes the integration test to ensure quality standards are met
  • Install: helps in installing the package ( JAR /WAR/EAR file) to the local repository
  • Deploy: helps in deploying the package from local repository to the build environment.

Apache Maven plugin goals using Command line execution

The Maven plugin is the collection of goals to be executed in different phases of the maven life cycle. The Maven plugin determines the order in which these goals are to be executed. Let’s try to understand how the above mentioned build life cycle phases gets executed when using the maven commands

mvn verify – This command performs the default life cycle . within default life cycle , it executes the Validate, compile, test , package phases before executing the verify. The maven commands checks and executes the required previous phases based on the command execution.

mvn clean deploy – This command is the performs the Clean life cycle which means maven does the project cleaning and then executes the deploy process for the project.

List of available plugin from Apache maven- https://maven.apache.org/plugins/

Apache Maven installation process on windows

The Apache Maven installation is supported on Windows, Linux , Mac OS platforms. Let’s go through the maven installation on windows.

  • Download Apache from the official site : https://maven.apache.org/download.cgi
  • Minimum JDK1.7 or above is to be installed on the computer for Maven to work
  • Ensure that the environment variable (JAVA_HOME) is set for java path
  • Ensure that the environment variable (MAVEN_HOME) is set for the maven path
  • Add Maven path in the Environment variable
  • Execute maven -verison on the command prompt to verify the maven installed version

select mysql database records in node.js

The tutorial provides the node.js integration with MySQL to fetch / retrieve records from the mysql database using the node.js program. The tutorial provides the steps on how to select record from mysql table using node.js application.

Node.js Select Record from MySQL Table

The MySQL uses ‘SELECT * FROM’ statement for selecting records into mysql table. Ensure that you have the mysql table with records before proceeding with the record selection process. The WHERE Clause and Order by clause can also be used in the SQL Query which is given as an example below.

var mysql = require('mysql');  
var con = mysql.createConnection({  
  host: "localhost",  
  user: "root",  
  password: ""  ,
  database: "oracleappshelpDB"
});
con.connect(function(err) {
  if (err) throw err;
  con.query("SELECT * FROM oracleappshelpusers order by firstName",  function (err, result) {
    if (err) throw err;
    console.log(result);
  });
});
var mysql = require('mysql');  
var con = mysql.createConnection({  
  host: "localhost",  
  user: "root",  
  password: ""  ,
  database: "oracleappshelpDB"
});
con.connect(function(err) {
  if (err) throw err;
  con.query("SELECT * FROM oracleappshelpusers where firstName ='Mohit'",  function (err, result) {
    if (err) throw err;
    console.log(result);
  });
});
var mysql = require('mysql');  
var con = mysql.createConnection({  
  host: "localhost",  
  user: "root",  
  password: ""  ,
  database: "oracleappshelpDB"
});
con.connect(function(err) {
  if (err) throw err;
  con.query("SELECT * FROM oracleappshelpusers order by firstName",  function (err, result) {
    if (err) throw err;
    console.log(result);
  });
});