SQL Server Create Alter and Drop Table

We have learnt How to Create SQL Server Database in previous blog –SQL Server Database Operations .  

The blog covers the topic on  how we can create table in SQL Server, alter table in SQL Server and drop table in SQL Server.

CREATE TABLE in our user defined database oracleappshelpDB. Lets consider we need to store the online users for the website – http://oracleappshelp.com

SQL Server Create Table Syntax:

CREATE TABLE tableName
(
Table_col_1 datatype [ NULL | NOT NULL ],
Table_col_2 datatype [ NULL | NOT NULL ],

Table_col_n datatype [ NULL | NOT NULL ]
);

WHERE
Table_col_1, Table_col_2, …Table_col_n depicts the NAMES of the Column in the TABLE
datatype depicts the type of data to be stored in that column
[ NULL | NOT NULL ] depicts of the column value could be NULL or NOT NULL (mandate)

CREATE TABLE oracleappshelpUsers
(
    UserId				 INT 							IDENTITY PRIMARY KEY,
    GivenName 			VARCHAR(128) 		NOT NULL,
    MiddelName 			VARCHAR(10),
    FamilyName 			VARCHAR(128) 		NOT NULL
)

Let’s enter the sample data using SQL Server Query. For that we need to use the INSERT SQL Query. Here is the syntax for that

INSERT INTO tableName
(Table_col_1, Table_col_2, …Table_col_n )
VALUES
(Table_col_value_1, Table_col_value_1, … Table_col_value_n),
(Table_col_value_1, Table_col_value_2, … Table_col_value_n),
…;

WHERE

Table_col_value_1 depicts the value for the first column of the table

Table_col_value_2 depicts the value for the second column of the table and so on..

Insert into oracleappshelpUsers values (1, 'Rohit', 'Kumar','Srivastava' );
Insert into oracleappshelpUsers values (2, 'Mohit', '','Sharma' );
Insert into oracleappshelpUsers values (3, 'Rajeev', 'Kumar','Jain' );
Insert into oracleappshelpUsers values (4, 'Snehashish', '','Nayak' );

Create New SQL Server Table from Existing Table

There could be need where you need to create a new SQL Server Table but it should have the same data elements / Columns. The below given SQL syntax can be used

Syntax – Create Table from existing Table

CREATE TABLE new_sql_server_table_name AS
SELECT Table_col_1, Table_col_2,…Table_col_n
FROM existing_table_name;

WHERE
Table_col_1, Table_col_2, …Table_col_n depicts the NAMES of the Column in the existing TABLE

CREATE TABLE oracleappshelpUsers_backup AS
SELECT UserId, GivenName,FamilyName
FROM oracleappshelpUsers;

New Table using SQL Server Management Studio

Please find below the steps for New Table using SQL Server Management Studio.

  1. Connect to Microsoft SQL Server Instance
  2. Expand the Object Explorer and select the Database oracleappshelpDB
  3. Right click on Table -> New -> Table
  4. Enter the Table Column Name , data type value
  5. Select if column is to be allowed as NULL or NOT NULL
  6. Save the table

SQL Server ALTER Table

This is again very common to add New Columns or to change the data type for the columns in the existing table. Below given is the syntax to ALTER the table as per need.

SQL Server ALTER Table – Add Column

Alter Table Syntax :

ALTER TABLE table_name
ADD column_name datatype [ NULL | NOT NULL ];

ALTER TABLE oracleappshelpUsers
ADD  DOB DATE  NOT NULL ;

Lets say if we need to have a column to store the Flag value for the users who are deleted or not . Then below SQL could be used by adding DEFAULT value.

ALTER TABLE oracleappshelpUsers
ADD  DELETED Varchar(1)  NOT NULL  DEFAULT 'N';

SQL Server Alter Table Drop Column

Lets say we added the column NICKNAME in the Table oracleappshelpUsers but it is not required as per the Database finalization .

Syntax – Alter Table Drop Column

ALTER TABLE table_name
DROP COLUMN column_name

SQLAlter Table Drop Column

ALTER TABLE oracleappshelpUsers
DROP COLUMN  NICKNAME

SQL Server Drop Table

Below given is the syntax and SQL Query for dropping the SQL Server Table.

Syntax – SQL Server Drop Table

Drop Table <table_name>

 Drop Table oracleappshelpUsers

SQL Server Truncate Table

Below given is the syntax and SQL Query for truncating the SQL Server Table. This SQL command allows to DELETE the data from the Table but Table remains there.

Syntax – SQL Server Truncate Table

Truncate Table <table_name>

Truncate Table <table_name>

Truncate Table oracleappshelpUsers

Below given is the complete Table with all columns having CONSTRAINTS.

CREATE TABLE oracleappshelpUsers
(
    UserId				 INT 							IDENTITY PRIMARY KEY,
    GivenName 			VARCHAR(128) 		NOT NULL,
    MiddelName 			VARCHAR(10),
    FamilyName 			VARCHAR(128) 		NOT NULL,
    DOB 				DATE 				NOT NULL,
	Address1 			VARCHAR(255) 		NOT NULL,
	Address2 			VARCHAR(255) 		NOT NULL,
	City	 			VARCHAR(100) 		NOT NULL,
	State 	 			VARCHAR(100) 		NOT NULL,
	Pincode				INT							,
	CreatedBy 			VARCHAR(128) 		NOT NULL,
	UpdatedBy 			VARCHAR(128) 		NOT NULL,
	CreatedDate			DATETIME			NOT NULL,
	UpdatedDate			DATETIME			NOT NULL	
)
SQL Server Single User Mode enablement

The Single user mode could be enabled for the user defined database. Lets see what could be the available options for you as a DBA Administrator for enabling single user mode.

While enabling this feature ensure that multiple users are not CONNECTED as the time of change, else all user connections gets closed without warning.

You should have DATABASE ALTER Permission to perform this activity.

Ensure that the AUTO_UPDATE_STATISTICS_ASYNC option is set to OFF . If enabled , you will NOT be able to access the Database in Single User mode.

SQL Server Single User Mode using SQL Server Management Studio

Please find below the steps for enabling Single User Mode using SQL Server Management Studio .

  1. Connect to Microsoft SQL Server Instance
  2. Expand the Object Explorer and select the Database oracleappshelpDB
  3. Right click on Database oracleappshelpDB and select Properties
  4. Select Properties -> Options
  5. Select Restrict Access ->Single
  6. In case of multiple users connected to the Database Open Connection message will be shown. Click “Yes” to close all connections.

SQL Server Single User Mode using Transact SQL

Please find below the steps for enabling Single User Mode using SQL

USE master;
GO
ALTER DATABASE oracleappshelpDB
SET SINGLE_USER
WITH ROLLBACK IMMEDIATE;
GO
ALTER DATABASE oracleappshelpDB
SET READ_ONLY;
GO

SQL Server increase database size

There could be a requirement where as a DBA Adminitrator you have been asked to increase the size for the existing SQL Server Database. The below options can be used for increasing SQL Server Database size.

Increase SQL Server Database Size using SQL Server Management Studio

Please find below the steps for increasing SQL Server Database size using SQL Server Management Studio.

  1. Connect to Microsoft SQL Server Instance
  2. Expand the Object Explorer and select the Database oracleappshelpDB
  3. Right click on Database oracleappshelpDB and select Properties
  4. Select Properties -> File
  5. Update the value for the Column Initial Size (MB) to increase the existing Database File Size. Minimum 1 MB to update to get the change reflected.
  6. You can also create a new File for the existing Database to increase the size. Click Add and enter the File name and the value for Initial Size (MB)

Increase SQL Server Database Size using T-SQL

The below SQL Query can be executed for increasing SQL Server Database size.

USE master;
GO
ALTER DATABASE oracleappshelpDB 
MODIFY FILE
    (NAME = oracleappshelpDatFile,
    SIZE = 100MB);
GO

SQL Server Database Operations

The blog provides the how to Create SQL Server Database, how to Select Database, How to Drop created Database in the MS SQL Server.

SQL Server Create Database

MS SQL Server provides various Database operations for which a SQL Server Database creation is required as a pre-requisite. MS SQL Server Database can be divided into 2 categories

  1. System Database
  2. User Database

System Databases are provided by MS SQL Server. Below given are the list of System Databases automatically provided:

  • Master
  • Model
  • MSDB
  • Tempdb
  • Resource
  • Distribution

User Databases are created by Database Administrator as per the application need.

Let’s say we need to have a new Database OracleappshelpDB. Below are the possible options to do the same.

Option 1:  Executed command for creating database

Syntax: Create Database <DATABASE_NAME>

SQL: Create Database OracleappshelpDB

Option 2: Using SQL Server Management Studio for creating database

  1. Connect to MS SQL Server.
  2. Right click on Database Folder
  3. Click -> New Database
  4. Enter the Database Name:OracleappshelpDB
  5. Owner: <Default>

SQL Server Select Database Command

Let’s say we have the table – ms_oracleapps_users which provides the listing of oracleappshelp registered users in the DATABASE – OracleappshelpDB. Below given are the possible option of selecting the data from the ms_oracleapps_users  table.

Option 1: Using T-SQL script

The below command allows/ enables you to use the Database OracleappshelpDB for performing the select query.

Syntax:

Exec use <DATABASE_NAME>

SQL: Exec use OracleappshelpDB

The below SELECT Query can be performed now on the  ms_oracleapps_users  table

Option 2: Using SQL Server Management Studio

Syntax: Select * from <DATABASE_NAME>               

SQL: Select * from ms_oracleapps_users

SQL Server Drop Database Command

Now let’s consider that we might not require the above created Database OracleappshelpDB. In that case, below given are the possible option of selecting the data from the ms_oracleapps_users table

Option 1: Using T-SQL script

The below command allows/ enables you to use the Database OracleappshelpDB for performing the select query.

Syntax: Drop Database <DATABASE_NAME>

SQL: Drop Database OracleappshelpDB

Option 2: Using SQL Server Management Studio

  1. Connect to MS SQL Server.
  2. Right click on the available Database – OracleappshelpDB
  3. Click -> Delete
  4. Click -> OK

  The Database OracleappshelpDB is removed.


Top beginners guide to SQL Server Tutorial

The SQL Server also known as MS SQL Server is a Relational Database Management System, developed by Microsoft. The tutorial provides the conceptual level details from basic to advanced SQL Server.

Microsoft SQL Server is a software which can be executed through network or can be installed locally on your computer.

The SQL Server tutorial includes topics like SQL Server Architecture, Installing SQL Server, SQL Server Data Types, SQL Server Create Database, SQL Server Drop Database, SQL Server Table creation commands, SQL Server Table Update commands, SQL Server Table Delete Commands, SQL Server DISTINCT Clause, SQL Server Group By Clause ,SQL Server TOP SQL commands, SQL Server Database Operations, SQL Server Aggregate Functions ( MIN, MAX,SUM, AVG, COUNT) , SQL Server Operators ( IS NULL, IS NOT NULL,UNION , LIKE, EXIST INTERSECT, IN, NOT, BETWEEN) , SQL Server Primary Key, SQL Server Foreign Key, SQL Server Create View, SQL Server Drop View, SQL Server Create INDEX, SQL Server Drop Index, SQL Server Create Trigger , SQL Server Drop Trigger, SQL Server Database backup, SQL Server Database Restore, SQL Server Interview Questions, SQL Server Common issues.

MS SQL Server Features

  • MS SQL Server is developed based on the RDBMS Specifications
  • MS SQL Server provides both Graphical User Interface as well as command-based software.
  • MS SQL Server is platform independent and scalable
  • MS SQL Server can be installed locally or can be connected through network
  • MS SQL Server supports an IBM Product, SQL (SEQUEL) language which is non-procedural, common database and case insensitive language
  • MS SQL Server provides SQL Server Analysis Services (SSAS) for the Data Analysis
  • MS SQL Server provides SQL Server Reporting Services (SSRS) for generating Data Reports
  • MS SQL Server provides SQL Server Integration Services (SSIS) for performing ETL (Extract, Transform, Load) operations.

Spring – Dependency Injection using Inversion of Control

What is Dependency Injection ?

“Dependency Injection”, the word itself clarifies that we are trying to Inject the dependency between the Parent Classes and the calling Class.  But how spring provides it as a Feature and how it is different from previous implementation, is what we need to understand.

Java Programming Concept is all about the object oriented programming, class instantiation, encapsulation and polymorphism. Spring also executes on the same implementation but it provides a simple approach where it allows to make a class independent from its dependencies. To achieve this and make classes loosely decoupled, Spring separates the class creation and class usage (invoked by another dependent class).

Dependency Injection is implemented by using the technique termed as ‘Inversion of Control’. First, we need to understand how IoC Container uses the Spring Framework.

How IoC Container uses the Spring Framework ?

Core Packages: The org.springframework.beans and org.springframework.context packages are the Core Component for Spring Framework IoC Container execution.

Bean Factory: The advanced configuration capability comes from the usage of the BeanFactory. It acts as a Factory class and provides Bean Definition for the multiple application beans and create instances of the bean whenever is requested by the client call.   

Application Context: The ApplicationContext provides access to the bean methods, loading file resources, publishing events, message resourcing supporting internationalization, parent context inheritance for easy integration.

Application Context implementatio n

The ApplicationContext provides the below given commonly used implementation:

  1. ClassPathXmlApplicationContext:  loads the context definition for the application by retrieving it from the XML File.
<strong>ApplicationContext context = new ClassPathXmlApplicationContext("bean.xml");</strong>
  • FileSystemXmlApplicationContext: loads the context definition for the application by retrieving it from the XML File placed in the File System.
<strong>ApplicationContext context = new FileSystemXmlApplicationContext("bean.xml");</strong>
  • XmlWebApplicationContext: loads the context definition for the application by retrieving it from the XML File within the web application.
<strong>&nbsp;ApplicationContext context = new XmlWebApplicationContext ("bean.xml");</strong>

Below given are the possible ways for implementing the Inversion of Control (Spring IoC Container):

  1. With the usage of Factory Pattern
  2. With the usage of Service Locator Pattern
  3. With the Inclusion of Dependency Injection through
  • The Constructor Injection
  • The Setter Injection
  • The Interface Injection

Dependency Injection – using Constructor Injection


Java OOP Principle – Single Responsibility Principle

Single Responsibility Principle is one of the SOLID principles of object-oriented programming.  There are five (5) design principles defined for developing Java application to make it more flexible, scalable and easy to maintain.

SOLID is an acronym for the below given 5 design principles.

  • Single Responsibility Principle
  • Open –Closed Principle
  • Liskov Substitution Principle
  • Interface Segregation Principle
  • Dependency Inversion Principle

The blog covers the 1st design principle – Single Responsibility Principle.

Robert C. Martin first published the theory of SOLID Principles 2000 paper Design Principles and Design Patterns.

The Design Principle – Single Responsibility depicts that every class should have the single responsibility to perform and ensure that the dependency should not be injected which makes the class changed again and again.

As per Robert C. Martin, he described as

“A class should have only one reason to change”

With the Current Business needs, there are many possible reasons that the implemented classes might get into change if they are not loosely coupled and have multiple dependent features within the same class. With such classes, the change in the requirement, requires the change in the already implemented classes. This happens so as each class is trying to perform more than a specific set of responsibilities and also contradicts the 1st OOP Principle of Single Responsibility.

Challenges with the above approach

Multiple changes in the existing class

  1. Multiple responsibilities injected in the same class makes it difficult to maintain
  2. Classes cannot be loosely coupled and thus does not provide flexibility.
  3. Recompilation of dependent classes
  4. Increased Testing to ensure included changes does not break the existing functionality.
  5. Written code cannot be re-used

Advantages of using Single Responsibility Principle

  1. Performs a specific responsibility
  2. Classes are loosely coupled
  3. Written Code can be re-used
  4. Does not require validation and re-compilation of dependent classes
  5. Helps in developing more robust and scalable applications
  6. Reduces coding issues and significantly reduces overall development time.
  7. Reduces testing cycle as specific set of changes need to be tested.
  8. Easy maintainability

Consider the MVC Framework, which segregates the Model, View and Controller and implements several classes internally which provide specific execution.

Similarly, the usage of Micro Services can have multiple API but each API will have separate resources for executing a specific set of responsibility. Example – The Customer API could have multiple resources as like createCustomer, updateCustomer, deleteCustomer, getCustomer, getCustomerList and so on.  Each resource segregates and performs specific operation.


Spring – Bean Scope

The most important component of the Spring Framework is the Spring Core Container which creates the objects, wires them together, manages the configuration and overall object life cycle from creation of the object till its destruction. These objects are called Beans which are created from the configuration metadata provided to the container. Configuration Metadata provides the information to the container with regard to bean

  1. Managing Bean Creation Process

2. Managing life cycle of the bean

3. Managing dependencies of the bean

Configuration Metadata Properties

Below are the commonly used properties for the configuration metadata in spring bean scope.

Name – specifies bean identifier

Class –  specifies the bean class for which bean is to be created

Constructor –arg – specifies the dependency injection  

Scope – specifies the scope of the object created from the bean definition

Properties – specifies properties for the dependency injection  

Auto wiring Mode – specifies the dependency injection  

lazy-initialization mode – specifies the lazy initiation of the bean instance. That is, bean instance is created when it is requested and not at the start-up of the application

initialization method – A callback to be called just after all necessary properties on the bean have been set by the container

destruction method – A callback to be used when the container containing the bean is destroyed

Configuration Metadata Methodologies

Configuration Metadata can be provided by using the below given methodologies

  • XML based configuration file.
  • Annotation-based configuration
  • Java-based configuration

Sample XML Configuration

<?xml version = "1.0" encoding = "UTF-8"?>

<beans xmlns = "http://www.springframework.org/schema/beans"
   xmlns:xsi = "http://www.w3.org/2001/XMLSchema-instance"
   xsi:schemaLocation = "http://www.springframework.org/schema/beans
   http://www.springframework.org/schema/beans/spring-beans-3.0.xsd">

   <!-- A simple bean definition -->
   <bean id = "..." class = "createCustomer">
    </bean>

   <!-- A bean definition with lazy init set on -->
   <bean id = "..." class = "..." lazy-init = "true">
    </bean>

   <!-- A bean definition with initialization method -->
   <bean id = "..." class = "..." init-method = "Initiate-customer-process">
   </bean>

   <!-- A bean definition with destruction method -->
   <bean id = "..." class = "..." destroy-method = "destruct-customer-process">
   </bean>

      
</beans>

Spring supported Bean Scope

The Spring Framework supports the below given bean scopes.

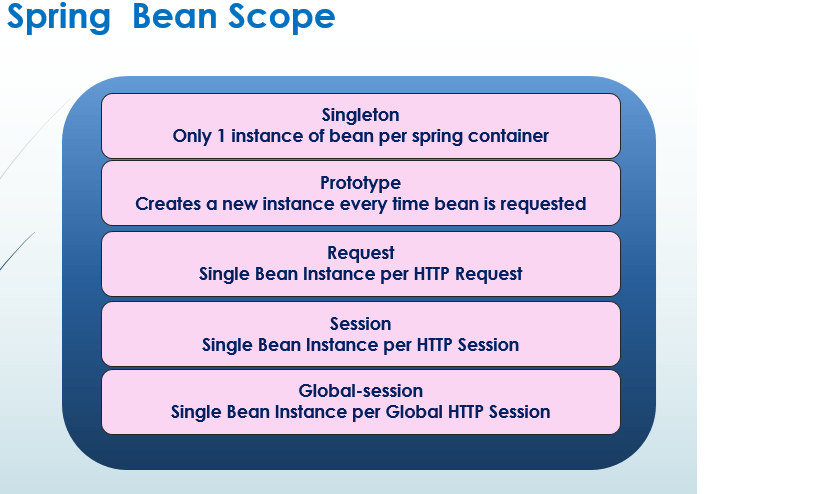
Singleton Scope:  With the use of singleton scope, Spring IOC Container creates only 1 bean instance of the object defined by the bean definition.

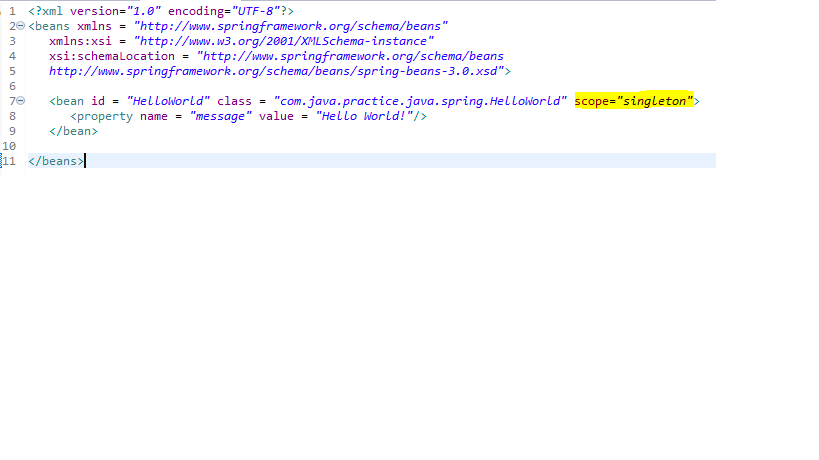
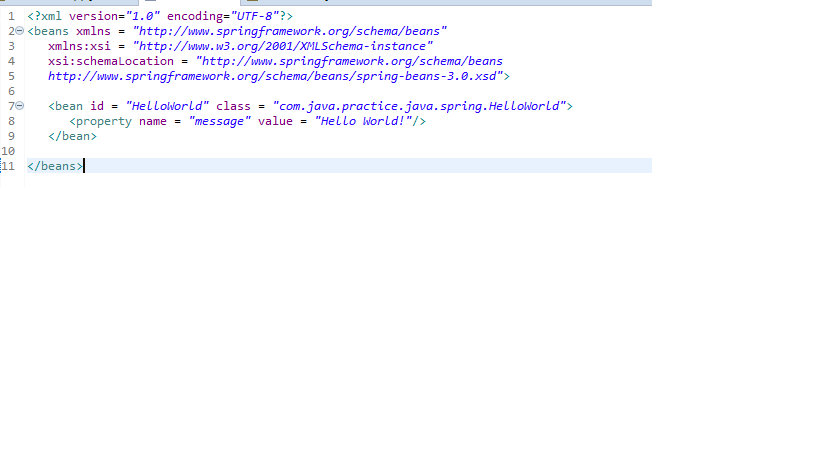
The below bean configuration file does not include the scope specified and thus makes it as a singleton instance.

spring-singleton-bean-scope

Another bean configuration with the usage of scope as “singleton”

spring-singleton-bean-scope

Prototype Bean Scope

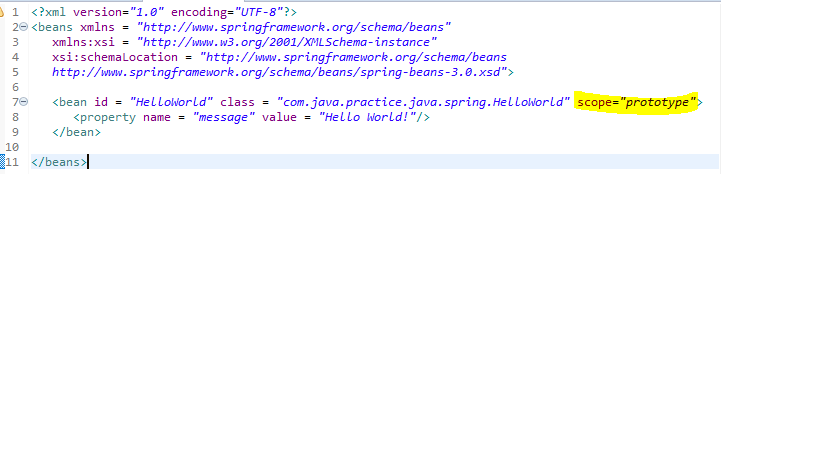
With the use of prototype scope, Spring IOC Container creates a new bean instance every time the bean is requested.

Spring Prototype Bean Scope

Bean Scope Annotation

Spring also provides annotation to define the bean scope as an alternative to the XML based configuration. The annotation based bean depends on bytecode metadata for wiring up components instead of angle-bracket declarations and allows developers to write the configuration into the component class itself by using annotations on the relevant class, method, or field declaration.

The RequiredAnnotationBeanPostProcessor, using a BeanPostProcessor in conjunction with annotations is a common means of extending the Spring IOC container.

Spring 2.5 also added support for JSR-250 annotations, such as @PostConstruct and @PreDestroy.

Spring 3.0 added support for JSR-330 (Dependency Injection for Java) annotations contained in the javax.inject package such as @Inject and @Named

Spring Bean Scope Annotation


Spring – IOC Container

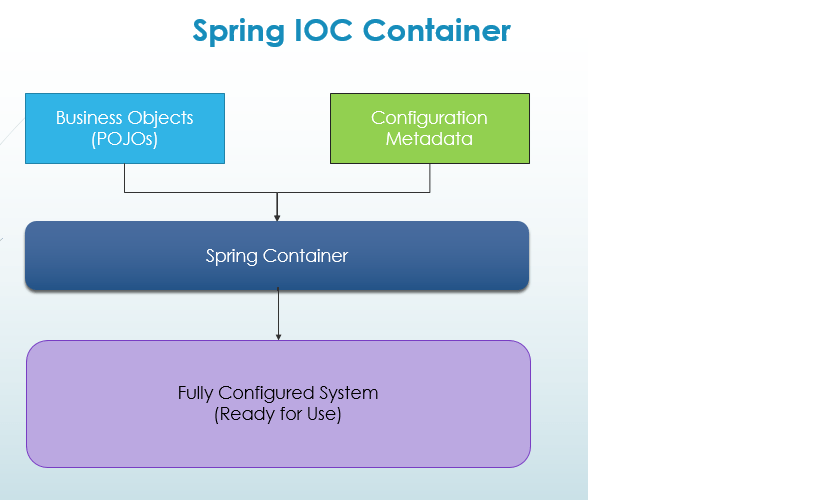
The most important component of the Spring Framework is the Spring Core Container which creates the objects, wires them together, manages the configuration and overall object life cycle from creation of the object till its destruction. We can also say that The IoC container is responsible to instantiate, configure and assemble the objects. The Spring container uses Dependency Injection (DI) to manage the components that make up an application. The below diagram depicts that the application classes are combined with the configuration metadata which creates and initializes the ApplicationContext and provides a fully customized application, ready for use

Spring IOC Container

Spring Containers

Spring provides two types of containers.

  • Spring BeanFactory container
  • Spring ApplicationContext container

Spring Bean Factory Container

Spring Bean Factory Container uses the org. springframework. beans. factory. BeanFactory interface and provides the support for Dependency Injection (DI) by registering different beans and their dependencies. The XmlBeanFactory is the implementation class for the BeanFactory interface. The constructor of XmlBeanFactory class receives the Resource object so we need to pass the resource object to create the object of BeanFactory.

Resource resource=new ClassPathResource(“applicationContext.xml”);  

BeanFactory factory=new XmlBeanFactory(resource); 

Spring ApplicationContext Container

The ClassPathXmlApplicationContext class is the implementation class of ApplicationContext interface. Use the below given syntax to instantiate the ClassPathXmlApplicationContext class to use the ApplicationContext as given below:

ApplicationContext context =   new ClassPathXmlApplicationContext(“applicationContext.xml”);  

spring- applicationContext container

The constructor of ClassPathXmlApplicationContext class receives string, so we can pass the name of the xml file to create the instance of ApplicationContext.

Below given are the possible ways for implementing the Inversion of Control (Spring IoC Container):

  1. With the usage of Factory Pattern
  2. With the usage of Service Locator Pattern
  3. With the Inclusion of Dependency Injection through
  • The Constructor Injection
  • The Setter Injection
  • The Interface Injection


Spring Architecture

Spring Framework is one of the most commonly used Java EE open source framework, initially written by Rod Johnson and was released under the Apache 2.0 license in June 2003. The Spring Framework provides a comprehensive and infrastructural support providing focus on building application-level business logic and reduces the ties on specific deployment environments.

The tutorial is designed on the Spring Version Spring 5 for the student and Java developers or anyone who wants to learn spring framework for implementing the learned skills to enhance their career path.

What is Spring Framework ?

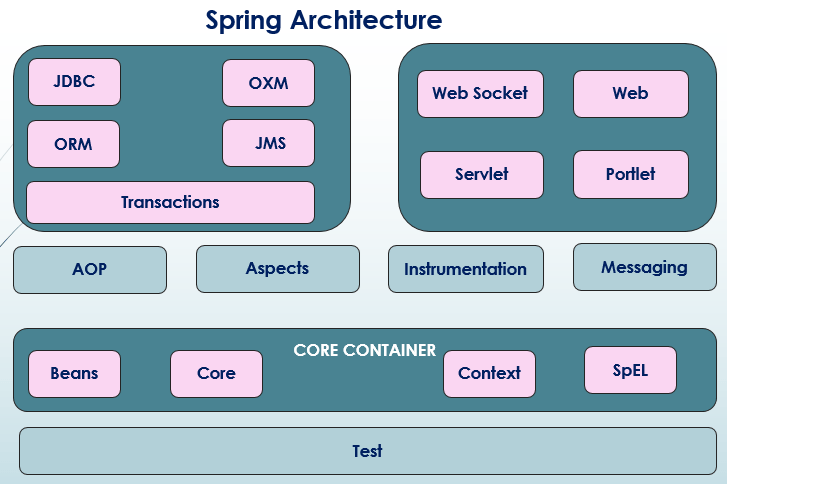
Spring framework is a modular architecture consisting of several modules (grouped as Core Container, Data Access/Integration, Web, AOP (Aspect Oriented Programming), Instrumentation, Messaging, and Test) which allows developers to build enterprise web applications with the ease. Developers can select the modules required for building the components of web applications without having to bring in all the modules and thus makes it lightweight and flexible as developers are using only the required set of modules and not the complete bundle . The below given is the Spring Architecture Diagram highlighting the main modules it provides. Let’s discuss about the architecture components to understand how they can be used in the application development.

Spring Architecture

Core Container in Spring

The Spring Core Container consists of spring-core, spring-beans, spring-context, spring-context-support, and spring-expression (expression language) modules

  • The spring-core and spring-beans modules provides the fundamental parts of the framework, including the IoC (Inversion of Control) and Dependency Injection (DI) features.
  • The spring-beans module provides BeanFactory, which inherits the implementation of the factory pattern.
  • The spring-context module provides the mechanism to access objects in a framework-style manner, similar to a JNDI registry with the base foundation of spring-core and spring-beans modules. The Context module inherits spring-beans module to provide support for internationalization (resource bundles), event propagation, resource loading, and the transparent creation of contexts (Servlet Container) and also supports Java EE features such as EJB, JMX, and basic remoting. The ApplicationContext interface is the focal point of the Context module.
  • The spring-expression (SpEL) module provides a powerful expression language for querying and manipulating an object graph at runtime.

Data Access / Integration in Spring

The Data Access/Integration layer consists of the JDBC, ORM, OXM, JMS and Transaction modules. Let’s discuss about these components to understand how they can be used in the application development.

  • The spring-jdbc (JDBC) module provides a JDBC-abstraction layer that removes the need for tedious JDBC related coding and parsing of vendor specific error codes.
  • The spring-orm (ORM)module provides integration layers for popular object-relational mapping APIs, including Hibernate, JPA, JPA, Top Link, JDO and iBatis.
  • The spring-oxm (OXM) module provides an abstraction layer that supports Object/XML mapping implementations for JAXB, Castor, XML Beans, JiBX and XStream
  • The spring-jms (Java Messaging Service -JMS) module contains features for producing and consuming messages.
  • The spring-tx (Transaction) module supports programmatic and declarative transaction management for classes that implement special interfaces and for all your POJOs

Web Layer in Spring

The Web layer consists of the Web (spring-web), Web-MVC(spring-webmvc), Web-Socket (spring-websocket) and Web Portlet (Web-Portlet) modules. Let’s discuss about these components to understand how they can be used in the application development.

  • The Web module provides basic web-oriented integration features such as HTTP Client for remoting support, multipart file-upload functionality and the initialization of the IoC container using servlet listeners and a web-oriented application context.
  • The Web-MVC module contains Spring’s Model-View-Controller (MVC) and REST Services implementation for web applications.
  • The Web-Socket module provides support for WebSocket-based, two-way communication between the client and the server in web applications.
  • The Web-Portlet module provides the MVC implementation to be used in a portlet environment and mirrors the functionality of Web-Servlet module

AOP , Aspects, Instrumentation in Spring

  • The spring-aop module provides an aspect-oriented programming implementation allows developers to define method interceptors and pointcuts to cleanly decouple code that implements functionality that should be separated.
  • The spring-aspects (Aspects) module provides integration with AspectJ, which is again a powerful and mature AOP framework
  • The spring-instrument (Instrumentation) module provides class instrumentation support and class loader implementations to be used in certain application servers. The spring-instrument-tomcat module contains Spring’s instrumentation agent for Tomcat

Messaging

The spring-messaging (Messaging) module provides key abstractions such as MessageMessageChannelMessageHandler and provides support for STOMP as the Web Socket sub-protocol to use in applications. It also provides the set of annotations for mapping messages to methods, similar to the Spring MVC annotation based programming model

Test module in Spring

  • The spring-test (Test) module supports the Unit testing and Integration Testing of Spring components with JUnit or


Oracle Weblogic : Tuning options for Database Source connections

Web Logic Server provides the capability of connecting to databases using Data Sources. Through Data Sources Web Logic provides the data access and database connection management activities. The created Data Source in Web Logic Server contains the connection pool of database connections for providing connections at run time to perform database operations.

The database operation could be considered costly in terms of performance if not tuned properly. Let’s identify the options what could be applied in different scenarios to achieve high performance while using data source connection pool.

1) JNDI Lookup Calls: Each Database call includes JNDI lookups which could be costly if same statement requires to be executed multiple times. Thus it is important for caching an object that required a look up in client
2) Reuse available connection: It could be useful if the application can reuse the received connection from the pool instead of closing and waiting to reacquire new connection.
3) Timely Connection Release: Connection should be released once it has performed the required action and should not be kept holding.
4) Configuring Row Pre Fetch: Row prefetching improves performance when receiving more rows from the external server to the client server in a single server access. Increasing Row Pre Fetch value will increase performance, until a particular value is reached
It is also to be noted that it is applicable only for external clients, not for clients in the same Java Virtual Machine (JVM) as the WebLogic Server.
Minimum value: 2
Maximum value: 65536
It is advisable to keep Minimum value as 100 as after 100 rows the performance hardly increases.
5) Connection Testing: Web Logic Server provides the way to validate and test the database connection before allocating it to the objects / applications.
The parameter Test Connection On Reserve enables the web logic server instance to check the database connection prior to returning the connection to a client.
The parameter Test Frequency is also used to validate the database connection.
Both these parameters are fairly expensive in terms of performance and should be avoided in the production environment.
6) Prepared and callable Statements: When an application connects to database for fetching the required application data, there are chances to have high processing overhead due to huge data size. Thus Web Logic Server provides the concept of caching the Prepared Statements and Callable Statements so that Web Logic Sever can reuse the statement stored in the cache.

Read the below blog on the detailing about statement cache in Web Logic Server Tune Data source Connection using Statement Cache

7) Limit Waiting Connection Request: If the connection is requested from the Data Source Connection Pool and multiple connection requests are waiting as Connection Pool has reached to its maximum capacity, then it might result into blockage of threads waiting to acquire new connection.
For this reason, the parameter value for Maximum Waiting for Connection (HighestNumWaiters) should be minimum. If the parameter value for Maximum Waiting for Connection is set to 0, then connection requests cannot wait for acquiring a connection and thus SQL exception – PoolLimitSQLException will be returned.

8) Connection Reserve Timeout: When Data Source Connection Pool reaches to its maximum capacity, then PoolLimitSQLException will be returned to the application(s). To avoid receiving the immediate connection timeout exception, configure Connection Reserve Timeout value (in seconds).
Default value for Connection Reserve Timeout: 10 seconds
If Connection Reserve Timeout is set to -1, then it will timeout immediately if no new connections available
If Connection Reserve Timeout is set to 0, then connection request(s) will wait for indefinite timeout till they are allocated with new available connection

9) Shrink Frequency: To increase the availability of connections in the pool Web Logic Server periodically shrinks the connection to its initial capacity based on usage. The Parameter Shrink Frequency value is to let web logic server know the number of seconds to wait before shrinking a connection pool. To Disable the Shrink Frequency, set the value to 0.

10) Database Listener Timeout: In case of applications having huge loads and consuming High CPU Utilization, it is observed that database listener get timeout while creating a new connection and throws ResourceDeadException and Socket read timed out connection errors.
To overcome such issues, it is advisable to increase the timeout value of the database server
sqlnet.ora: SQLNET.INBOUND_CONNECT_TIMEOUT=180
listener.ora: INBOUND_CONNECT_TIMEOUT_listener_name=180

11) Recovering Leaked Connections: The connections which are not properly returned back to the Data Source Connection Pool can be considered as Leaked Connections. The parameter Inactive Connection Timeout can be configured (in seconds) whenever data source maintenance thread runs it will check for the connections which are Inactive more than the set value in the parameter and will returned them back forcibly to the connection pool.
12) Pinned-To-Thread: Normally the connection request is allocated with the new data source connections and once the thread is executed the connection is returned back. In case of enablement of the PinnedToThread Property WebLogic Server pins a database connection from the data source to a connection requested thread for the first time when an application uses the thread to reserve a connection. After finishing the assigned task, instead of returning the connection back to the connection pool, Web Logic server keeps the connection requested thread and does not return it to the data source and keep it reserved for the next connection requested thread to allocate when request for new connection again.
With the enablement of PinnedToThread property, the connection pooling behaviour will notice the below changes
Maximum Capacity is ignored
Shrinking does not apply to connection pools with PinnedToThread enabled as connections are reserved and not returned back to the connection pool
• When web logic reset the connection pool, it marks the connections as Test Needed and for that Test Connections on Reserve need to be enabled as PinnedToThread keeps the connections on reserve.
• The PinnedToThread feature does not work with an IdentityPool, an error is thrown and the data source will not deploy
• With PinnedToThread enabled, does not support connection labelling, exception is thrown when trying to get a connection with label properties
• When PinnedToThread is enabled, the maximum capacity of the connection pool becomes the number of execute threads used to request a connection multiplied by the number of concurrent connections each thread reserves and exceeds the maximum capacity


How to Tune Data Source Connection Pool using statement cache

The Data Source connections are required to retrieve / store the application data from/to the database. The Web logic Server provides the below types of statements to be executed to exchange the data from database.

1. Statements (General SQL Statements)
2. Prepared Statements
3. Callable Statements (Stored Procedure)

When an application connects to database for fetching the required application data, there are chances to have high processing overhead due to huge data size. Thus Web Logic Server provides the concept of caching the Prepared Statements and Callable Statements so that Web Logic Sever can reuse the statement stored in the cache.

The Statement Cache is applicable on the Data Source, however each connection maintains its own statement cache for Prepared Statements and Callable Statements

Possible configurations for Statement Cache:
1. Statement Cache Type:
The statement cache type uses the below given algorithm to identify which statements to be stored in the statement cache.
LRU Algorithm: LRU is Least Recently Used algorithm defined as default for the statement cache type.
When a Prepared Statement or Callable Statement is received by the Web Logic Server for processing, it validates from the Cache statements with the statements already in cache.
– If the received statement exists, then Web Logic Server returns the statement and execute the existing statement for processing.
– If the received statement does not exist and considered to be as new statement, then Web Logic Server validates statement Cache Size or confirm if total cache size is reached or not.
o If the cache size is not reached, then Web Logic Server will store the statement
o If the cache size is reached, then Web Logic server will check for the statement which is least recently used and replace the least recently used statement with the new statement.

Fixed Algorithm:
In case of Fixed algorithm, Web Logic Server accepts and store the statements in cache till the statement Cache Size is reached. Once the statement Cache Size is reached, the newly received statements will not be cached.

2. Statement Cache Size:
The statement cache size is the total number of Prepared Statement or Callable Statement which are allowed to be cached for each connection of the data source in the Web Logic Server.
It is to be noted that too many open connections might impact the DBMS resource cost if cursors are included for execution.

The memory consumption depends on the below calculations
number of data sources * number of connections * number of statements
Example: Let’s assume the below numbers
Data Source connection: 10
Deployed Servers: 2
Statement Cache Size: 10
As per the calculation the total open cursors required at database server will be (10 *2*10) = 200 cursors for the cache statements.

Setting the size of the statement cache to 0 turns off statement caching
Minimum value: 0
Maximum value: 1024