TTY module methods in node.js

The tutorial provides the detail on the node.js TTY module. The node.js TTY module provides the capability to run the node.js with a Text Terminal (TTY) attached. The node.js tty module provides the tty.ReadStream and tty.WriteStream classes. The node.js tty module can be accessed using the below command

const tty = require('tty');

The node.js peforms the below activities when it is being run as a TTY context:

  • process.stdin to be initialized as an instance of tty.ReadStream
  • process.stdout and process.stderr to be the instances of tty.WriteStream

Validate if Node.js is running as TTY context

The below command can be used to identify if the node.js is being run as TTY context

C:\Users\user\Desktop>node -p -e "Boolean(process.stdout.isTTY)"
var tty = require('tty');  
process.stdin.setRawMode(true);  
process.stdin.resume();  
 console.log('This is sample text to show TTY module usage...');  
process.stdin.on('keypress', function(char, key) {  
  if (key && key.ctrl && key.name == 'c') {  
     
    process.exit()  
  }  
});
C:\Users\user\Desktop >node nodejs-tty.js
This is sample text to show TTY module usage...

Class tty.ReadStream in node.js TTY module

The class tty.ReadStream in the TTY module is for reading the TTY Context and uses the process.stdin as the instance for the tty.ReadStream. The below given are the class methods for tty.ReadStream

tty.ReadStream Class Methodstty.ReadStream Method Description
readStream.isRawreturns TRUE if the TTY is configured to operate as a raw device
readStream.isTTYalways TRUE for tty.ReadStream instances
readStream.setRawMode(mode) mode: TRUE if the tty.ReadStream is configured to operate as a raw device
return: <this> which returns the read stream instance

Class tty.WriteStream in node.js TTY module

The class tty.WriteStream in the TTY module is for writing the TTY Context and uses the process.stdout and process.stderr as the instance for the tty.WriteStream.

Event: ‘resize’: The event resize is invoked when the writeStream.cloumns or writeStream.rows have changed but it does not return any arguments to the listener callback.

process.stdout.on('resize', () => {
  console.log('application screen size has changed!');
  console.log(`${process.stdout.columns}x${process.stdout.rows}`);
});

node.js file system synchronous and asynchronous form

The tutorial provides the detail about the node.js file processing mechanism and how to use the node.js fs module. The node.js fs module provides the I/O operations modeled around standard POSIX functions. The fs module can be accessed using the below command:

const fs = require('fs');

synchronous and asynchronous form in the node.js file system

The node.js fs module provides the support for synchronous and asynchronous forms. The exceptions occured in the synchronous forms are thrown immediately using the try…catch { } . The Asynchronous forms provides arguments where last arguments always returns the callback. The first arguments is available for capturing the exception. If there is no exception then first argument will be returned as null /undefined.

Place the file at the location and mention it in the sample program for asynchronous form execution

const fs = require('fs');
fs.unlink('/tmp/test-fs-async/remove-async-file.txt', (err) => {
  if (err) throw err;
  console.log('The file removed successfully from the path -/tmp/test-fs-async/remove-async-file.txt');
});
C:\Users\user\Desktop >node fs-async.js
The file removed succesfully from the path -tmp/test-fs-async/remove-async-file.txt

sample program for the synchronous form execution

const fs = require('fs');
try {
  fs.unlinkSync('/tmp/test-fs-async/remove-async-file.txt');
   console.log('The file removed successfully from the path -/tmp/test-fs-async/remove-async-file.txt');
} catch (err) {
  // code for handling error 
}
The file removed succesfully from the path -tmp/test-fs-async/remove-async-file.txt

Node.js asynchronous ordering

In case of asynchronous execution, the ordering of methods is not guaranteed. In the below given example related to the file renaming, if we call fs.stat() operation before the fs.rename() then it could lead to error.

fs.rename('/tmp/test-fs-async/remove-async-file.txt', '/tmp/world', (err) => {
  if (err) throw err;
  fs.stat('/tmp/test-fs-async/sync-file.txt', (err, stats) => {
    if (err) throw err;
    console.log(`stats: ${JSON.stringify(stats)}`);
  });
});

Node.js File System Flags

The fs module provides below given syntax for opening the file

fs.open(path, flags[, mode], callback)    where
path: path string with the file name

flags: depicts the behavior of the file to be opened.

mode: sets the file mode if the file was created. It defaults to 0666, readable and writable.

callback: This is the callback function which gets two arguments (err, fd)

The below given are the commonly used file system flags.

File System Flag File system flag Description
‘a’allows to append the opened file. In case file does not exist, it created the file with the name specified.
‘ax’ similar functioning as ‘a’ but fails execution if path exists
‘a+’ allows to open the file for reading and it can be appended. In case file does not exist, it created the file with the name specified.
‘ax+’ similar functioning as ‘a+’ but fails execution if path exists
‘as’ allows to append the opened file for reading in the synchronous mode. In case file does not exist, it created the file with the name specified.
‘as+’allows to open the file for reading and it can be appended in the synchronous mode. In case file does not exist, it created the file with the name specified.
‘r’allows to open the file for ready. Gives error in case file does not exist.
‘r+’ allows to open file for reading and writing. Gives error in case file does not exist.
‘rs+’allows to open file for reading and writing in synchronous mode and instruct operating system to bypass the local file system cache.
‘w’allows to open file for writing . In case file does not exist, it creates the file.
‘wx’similar functioning as ‘w’ but fails execution if path exists
‘w+’allows to open file for reading and writing . In case file does not exist, it creates the file.
‘wx+’similar functioning as ‘w+’ but fails execution if path exists

File information using node.js file system

The below given syntax provides the file related information

fs.stat(path, callback)  , where

path: path string with the file name

callback: This is the callback function which gets two arguments (err, stats)

fs stats class methods in node.js file system

fs stat class methodsfs stat class method description
stats.isfile()returns true if file type is normal file.
stats.isdirectory() returns true if file type is directory
stats.isblockdevice() returns true if file type is of a block device
stats.ischaracterdevice() returns true if file type is of a character device
stats.issymboliclink() returns true if file type is of symbolic link
stats.isfifo() returns true if file type is of fifo ( file-in-file-out)
stats.isscoket() returns true if file type is of a socket

Node.js fs promises API

The node.js fs promises API provides and alternate approach than calling asynchronous file system methods. It returns the promise object than using the callbacks. The promises API can be accessed using the below given command:

require(‘fs’).promises


Stream module methods in node.js

The tutorial provides the details on the node.js streams module. The node.js streams module provides the capability of reading the data from the source and writing the data to the destination. Thus, node.js provides the readable and writable streaming process.

The node.js streams module can be accessed using the below given command:

const stream = require('stream');

Node.js stream types:

The below given are the node.js stream types available for the usage:

Stream Type Stream Description
Readablestream available for read operations – fs.createReadStream()
Writablestream available for write operations – fs.createWriteStream()
Duplex stream available for both read and write operations – net.socket
Transform type of duplex stream which can transform or modify data – zlib.createDeflate()

Node.js stream events

The below given are the events supported by the stream types:

Stream Event Stream Event Description
Dataevent fires when data is available to read
End event fires when no further data is available to read
Error event fires when receives and error
Finish event fires when data is flushed to the system

Reading data from node.js stream

var fs = require("fs");  
var data = '';  
// Define the readable stream object
var readerStream = fs.createReadStream('stream-readable-file.txt');  
// Define encoding for the stream - UTF8  
readerStream.setEncoding('UTF8');  
// DEfine stream events   
readerStream.on('data', function(chunk) {  
   data += chunk;  
});  
readerStream.on('end',function(){  
   console.log(data);  
});  
readerStream.on('error', function(err){  
   console.log(err.stack);  
});  
console.log("Reading though steam module is completed");

Writing data to stream

var fs = require("fs"); 
// custom message for writing 
var data_to_write = 'This is an exmaple of writing the data to the file using writable stream ';  
// DEfine the writable stream  
var writerStream = fs.createWriteStream('stream-writable-file.txt');  
//seeting the data with the encoding 
writerStream.write(data_to_write,'UTF8');  
writerStream.end();  
writerStream.on('finish', function() {  
    console.log("Write completed.");  
});  
writerStream.on('error', function(err){  
   console.log(err.stack);  
});  
console.log("progam for writing the data through stream module is completed"); 

Node.js stream buffering

The node.js streaming process uses the internal buffer for storing the data . The below given are the methods to retrieve buffer data for readable and writable streams

Stream Type Stream Buffer Method
Readable Streamsreadable.readableBuffer
Writable Streamswritable.writableBuffer

The maximum streaming data data can be stored in buffer depends on the highWaterMark option passed into the stream’s constructor. HighWaterMark can stores the data into bytes or into objects.

The streaming data in readable streams is buffered when implementation calls the stream.push(chunk)

The streaming data in writable streams is buffered when implementation calls the writable.write(chunk)

The limit of buffering the data to avoid memory consumption or perfromance issue is maintained by stream.pipe() method in the stream API

Duplex and Transform streams are both readable and writable and maintains separate buffer to perform read and write operations

Node.js Piping Stream

The piping stream is the mechanism where the output of one stream becomes the input for the another stream.

var fs = require("fs");  
var readerStream = fs.createReadStream('stream-readable-file.txt');  
var writerStream = fs.createWriteStream('stream-writable-file.txt');  
readerStream.pipe(writerStream);  
console.log("Node.js piping stream program completed"); 

The content of the input file is written to the writable file

Node.js chaining stream

The node.js chaining stream is the mechanism where the chain is created with multiple streams operations by connecting output of one stream as the input of another stream.

var fs = require("fs");  
var zlib = require('zlib');  
fs.createReadStream('stream-readable-file.txt')  
  .pipe(zlib.createGzip())  
  .pipe(fs.createWriteStream('stream-readable-file.txt.gz'));  
  console.log("The input file is compressed successfully.");  

TLS/SSL module methods in node.js

The tutorial provides the details on the node.js TLS /SSL module where TLS (Transport Layer Security) and SSL (Secure Socket Layer) protocols uses the public/private key infrastructure (PKI) for data communication on the TCP Protocol.. The node.js module for TLS/SSL can be added using the below command:

const tls = require('tls');

The TLS /SSL Protocols are built on top of the OpenSSL and for each secure communication and each Client and Server should have a private key which can be generated in many ways.

OpenSSL command-line interface to generate a 1024-bit RSA private key:
openssl genrsa -out ryans-key.pem 1024

All server communicating using TLS/SSL protocol should have a certificate which are are digitally signed (Certificate Authority) . Each Certificate contains public-key that correspond to a private key. There are also self-signed certificates signed by the owner of the private key . The certificates can be created using Certificate Signing Request (CSR) file.

OpenSSL command-line interface can be used to generate a CSR for a private key
openssl req -new -sha256 -key ryans-key.pem -out ryans-csr.pem

The generated CSR File requires to be sent to Certificate Authority or get the self-signed certificate. OpenSSL command-line interface for genrating self-signed certificate:
openssl x509 -req -in ryans-csr.pem -signkey ryans-key.pem -out ryans-cert.pem

The generated certificate is to be converted to .pfx or .p12 file using the below OpenSSL command-line-interface:

openssl pkcs12 -export -in ryans-cert.pem -inkey ryans-key.pem \
-certfile ca-cert.pem -out ryans.pfx

Perfect Forward Secrecy

Perfect Forward Secrecy is the feature of key-exchange methods where if the server’s private key is compromised , then communication can be decrypted only by  eavesdroppers in case key-pair is obtained through the hacking process. Perfect Forward Secrecy generated the key-pair randomly for key-exchange for the TLS/SSL handshake. The below given methods are defined to achieve Perfect Forward Secrecy is called ‘ephemeral’.

  • DHE: An ephemeral version of the Diffie Hellman key-agreement protocol.
  • ECDHE: An ephemeral version of the Elliptic Curve Diffie Hellman key-agreement protocol

The DHE method of Perfect Forward Secrecy need to generate Diffie-Hellman parameters and specify with the dhparam option to tls.createSecureContext(). The OpenSSL command-line interface to generate DHE parameters:
openssl dhparam -outform PEM -out dhparam.pem 1024

ALPN and SNI

ALPN (Application-Layer Protocol Negotiation Extension) and SNI (Server Name Indication) are TLS handshake extensions:

  • ALPN: permits 1 TLS server for multiple protocols (HTTP, HTTP/2)
  • SNI: permits 1 TLS server for multiple hostnames with different SSL certificates

Session Resumption

TLS Session requires to save the session state to ensure the reuse of it for TLS handshake between client and server communications. The below given are the mechanism which are used frequently

Session Identifier: When Client creates a new connection in the session, server sends a unique Id to client which is saved by the client. Client send the same unique id for another connection within the same session and if the server has unique Id for the same session state , sever agrees to use it , else server creates a new session with a new unique Id and sends it back to client.

Below steps are performed between node.js and server communicating session Ids:

  • Node.js client waits for the ‘session’ event to get the session data
  • Node.js calls tls.connect() to resue the session state
  • Servers consuming session state should have implementation of ‘newSession’ and ‘resumeSession’ events to save and restore the session Ids
  • In case of clustered servers, servers must use shared session cache in the session handlers.

Resumption using the session identifier is supported by all browsers running HTTPS requests.

Session Tickets: The Session Tickets is the process where server encrypts the session and send it back to client as ‘Ticket’. When client reconnects with the server , it sends the shared ticket to the server. If the ticket is not decrypted by the server , then server will create a new ticket and sends it back to client , else it will consume the received ticket and perform the decryption to process the request.

Below steps are performed between node.js and server communicating session tickets:

  • Node.js consumes the same APIs for session tickets and session identifiers
  • tls.TLSSocket.getTLSTicket() returns the value
  • The session contains the ticket or it contains the client-side session state

Session ticket keys are cryptographic keys and must be stored securely. If session tickets are compromised , then all sessions using the session tickets can be decrypted. Thus session tickets should be generated frequently and not be stored on disk.

Resumption using the session tickets is supported by all browsers running HTTPS requests.


Nodejs Debugger tutorial for beginners

The tutorial provides the details on the node.js debugger module. The node,js debugger module provides the debugging utilies using in-built debugging client and V8 inspector ( https://nodejs.org/api/debugger.html #debugger_v8_inspector_integration_for_node_js ) .

Node.js debugger syntax

The usage of debugging in the node.js can be done by starting the node.js with the inspect argument , provided with the script path for which debugging is to be enabled.

Syntax:

node debug [script.js | -e “script” | <host>:<port>]  

Example : node debug crypto-cipher.js

Node.js Debugger – Points to consider

  • The inclusion of the statement debugger in the script code enables the breakpoint at that line code.
  • The REPL Commands allows the code to be evaluated remotely.
  • The next command enables debugger to step to the next line for debugging
  • Help Commands provides the list of available commands for Debugger
  • Pressing ENTER only without comamds , executes the previous debugger command
  • Node.js debugger allows to watch/ display the values for expressions and variables. The command watch(‘expression_to_watch’) to be typed. To remove the watcher , type the command unwatch(‘expression_to_watch’)
  • The command cont, c allows the continue execution of debugging the code
  • The command step, s allows the step-into the debugging
  • The command out, 0 allows the step-out of the debugging
  • The command pause stops the debugging
  • The command run allows to run the script
  • The command restart allows to restart the script
  • The command kill allows to kill the script


Crypto module method in node.js

The tutorial provides the details about the Node.js Cypto module . The crypto module includes the set of wrappers for open SSL’s hash HMAC, cipher, decipher, sign and verify functions for providing cryptographic  functionality. We need to include require(‘crypto’) as the module . Let’s see the simple example .

Example to know if crypto module is enabled or not

let crypto;
try {
  crypto = require('crypto');
  console.log('Crypto is enabled');
} catch (err) {
  console.log('crypto support is disabled!');
}

What is Hash in Node.js crypto module ?

A hash is a fixed-length string of bits generated from some arbitrary block of source data.

What is HMAC in Node.js crypto module ?

HMAC means Hash-based Message Authentication Code.

HMAC is the process for applying a hash algorithm to both data and a secret key that results in a single final hash.

node.js crypto example using Hash and HMAC

const crypto = require('crypto');
const secret = '122112';
const hash = crypto.createHmac('sha256', secret)
                   .update('This is node.js crypto example')
                   .digest('hex');
console.log(hash);

Node.js Class Certificate in crypto module

The node.js crypto module uses the SPKAC ( Certificate Signing Request mechanism originally implemented by Netscape ) for providing the certificate. OpenSSLs SPKAC Implementation details can be found here- https://www.openssl.org/docs/man1.1.0/man1/openssl-spkac.html

Node.js Class Cipher in crypto module

The node.js uses the class Cipher for encrypting the data in the below given ways:

  • As part of streaming , plain unencrypted data to convert into encrypted data form that is both readable and writeable
  • impementing the cipher.update() and cipher.final() method for encrypting the data.

The cipher objects cannot be created using the new Keyword. For creating the cipher instances, the crypto.createCipher() or crypto.createCipheriv() methods can be used

const crypto = require('crypto');  
const cipher = crypto.createCipher('mks212', 'password');  
var convert_to_encrypted_data = cipher.update('Using Cipher for encryption in crypto module', 'utf8', 'hex');  
convert_to_encrypted_data += cipher.final('hex');  
console.log(convert_to_encrypted_data);

Run time example in case of error for Cipher creation

Node.js Class Decipher in crypto module

The node.js uses the class Decipher for decrypting the data in the below given ways:

  • As part of streaming , plain encrypted data to convert into decrypted data form that is both readable and writeable
  • impementing the decipher.update() and decipher.final() method for decrypting the data.

The decipher objects cannot be created using the new Keyword. For creating the decipher instances, the crypto.createDecipher() or crypto.createDecipheriv() methods can be used

const crypto = require('crypto');  
const decipher = crypto.createDecipher('mks212', 'password');  
var encrypted = 'c414206f46af864a92b11c4f1273cd87718624840cb72956c48f60df8b12882f898c185115598b8a16a80629ef41aedb';  
var convertodecrypteddata = decipher.update(encrypted, 'hex', 'utf8');  
convertodecrypteddata += decipher.final('utf8');  
console.log(convertodecrypteddata); 

Net module method streaming types in node.js

The tutorial provides the node.js Net module details. The node.js Net module provides the developers to write Asynchronous API streaming using sockets in node.js for integrating client and server applications or chat applications.

Node.js Net streaming types

  • Asynchronous API Streaming using TCP or IPC Servers (net.createServer)
  • Asynchronous API Streaming using Clients (net.createConnection)

Let’s discuss the available classes with methods which can be used for Net module

Class – net.server

The Class net.server is used to create TCP or IPC Server. It includes the below arguments

<object> – net.createServer([options][, connectionListener])

connectionListener <function> – sets the connection ‘event’

Return <net.server> where net.server supports the below given eventEmitter

net.createServer([options][, connectionListener])

  • options allowHalfOpen – Default value is false , depicts if half-opened TCP connections are allowed or not.
  • pauseOnConnect – Default value is false , depicts if the socket should be paused on incoming connections or not.
  • connectionListener – sets the listener for the ‘connection’ event.
    Returns: net.server
net.server eventEmitter Namenet.server eventEmitter Description
Event:‘close’enables that the server is closed. This event will not enable
if connection exists
Event:‘connection’enables when the connection is created. Uses <net.socket>
as the connection object
Event:‘error’enables when the error is occurred. This event will not enable
until server.close() is invoked.
Event:‘listening’ enables when the server is bounded after invoking server.listen()

server.address() of node.js net.Server class

The below given is the server.address( ) example using the node.js net module

const net = require('net');  
const server = net.createServer((socket) => {
  socket.end('socket is closed \n');
}).on('error', (err) => {
  // Handle errors here.
  throw err;
});
// retrive unused port.
server.listen(() => {
  console.log('opened server on', server.address());
});

server.close ([callback])

The callback function is invoked when the server is closed

Returns <net.server>

server.connections

Provides the list of number of connections available on the server.

Return <integer> / Null

server.getConnections([callback])

The callback function is invoked when socket is sent to forks and returns the number of connections on the server asynchronously.

Returns <net.server>

server.listen()

Enables when the server starts listening for connections. The server.listen() can listen to the TCP or IPC Server.

The below given are the possible sever.listen() signatures:

  • server.listen(handle[, backlog][, callback])
  • server.listen(options[, callback])
  • server.listen(path[, backlog][, callback]) for IPC servers
  • server.listen([port[, host[, backlog]]][, callback]) for TCP servers

server.listen() – Points to consider:

  • All server.listen() methods are invoked asynchronously.
  • Callback parameters acts as the listener for the ‘listening’ event
  • backlog parameter specifies the maximum length of the queue of pending connections
  • The server.listen() method can be invoked again in case of an error during the first server.listen() call or in case server.close() has been inititated. The error ERR_SERVER_ALREADY_LISTEN is thrown is the server is already listening and has been invoked again.

class – net.connect()

The net.connect() is an alias to the net.createConnection() .The below given are the possible net.connect signatures:

  • net.connect(options[, connectListener])
  • net.connect(path[, connectListener]) for IPC connections.
  • net.connect(port[, host][, connectListener]) for TCP connections.

net.connect(options[, connectListener])

The method is an alias to the net.createConnection(options[, connectListener]). The methods incudes the below given parameters

  • options
  • connectListener <function>
  • Returns: <net.socket>

net.connect(port[, host][, connectListener])

The method is an alias to the net.createConnection(port[, host][, connectListener]). The methods incudes the below given parameters

  • port <number>
  • host
  • connectListener <function>
  • Returns: <net.socket>

net.connect(path[, connectListener])

The method is an alias to the net.createConnection(path[, connectListener]). The methods incudes the below given parameters:

  • options
  • connectListener <function>
  • Returns: <net.socket>

Class – net.createConnection

The net.createConnection() is used to create the new socket connection. The server.connect( ) returns the net.socket <object> when the connected is started. On the connection establishment, the ‘connect’ event will be emitted. connectListener is the ‘listening’ event for the connection.

The below given are the possible net.createConnection method signatures:

  • net.createConnection(options[, connectListener])
  • net.createConnection(path[, connectListener]) for IPC connections.
  • net.createConnection(port[, host][, connectListener]) for TCP connections.

net.createConnection(options[, connectListener])

The methods incudes the below given parameters:

  • options Required. passed to both the new net.Socket([options]) call and the socket.connect(options[, connectListener]) method.
  • connectListener Common parameter of the net.createConnection(), sets the listener for the ‘connection’ event
  • Returns: //new socket connection
const net = require('net');
const client = net.createConnection({ port: 7001 }, () => {
  // invoking the 'connection' listener.
  console.log('Server is connected successfully....');
  client.write('Sample program for socket creation throug client ..\r\n');
});
client.on('data', (data) => {
  console.log(data.toString());
  client.end();
});
client.on('end', () => {
  console.log('server closed successfully...');
});

In case of server connection error , the below given error should be given by the client program


OS module method in node.js

The tutorial provides the node.js OS module details. The node.js OS module provides the operating system related utilities and methods for the usage in the node.js application.

Node.js OS module Syntax

The node.js OS module can be accessed by adding the below given command:

const os = require('os');

The below given are the available operating system methods and utilities

OS Method NameOS Method Description
os.homedir( ) retruns the home directory of the current user
os.arch()provides the CPU architecture of the Operating System
os.hostname( ) provides the hostname of the Operating System
os.cpus( )provides data related to each cpu/core installed: model, speed (in MHz),
and times (an object containing the number of milliseconds the cpu/core
spent in: user, nice, sys, idle, and irq) . Returns array of object.
os.endianness( )provides the endianness of the cpu.
‘BE’ – big endian , ‘LE’ – little endian.
os.freemem( )provides free system memory in bytes
os.loadavg( ) provides the  time fraction taken by system activity, calculated by the
operating system and expressed as a fractional number . Returns array of object with 1, 5, and 15 minute load averages
os.networkinterfaces( ) provides list of network interfaces
os.platform( ) provides operating system platform details of the server
os.release( ) provides operating system release
os.userinfo([options]) provides subset of the password file entry for the current user
os.uptime( ) provides system uptime in seconds
os.totalmem( ) provides total system memory in bytes
os.type( ) provides the operating system name
os.tmpdir( ) provides operating system default directory for temporary files

Node.js os.EOL example

os.EOL – indicates the operating system end of line specifier .

os.EOL Examples:

\n on POSIX
\r\n on Windows

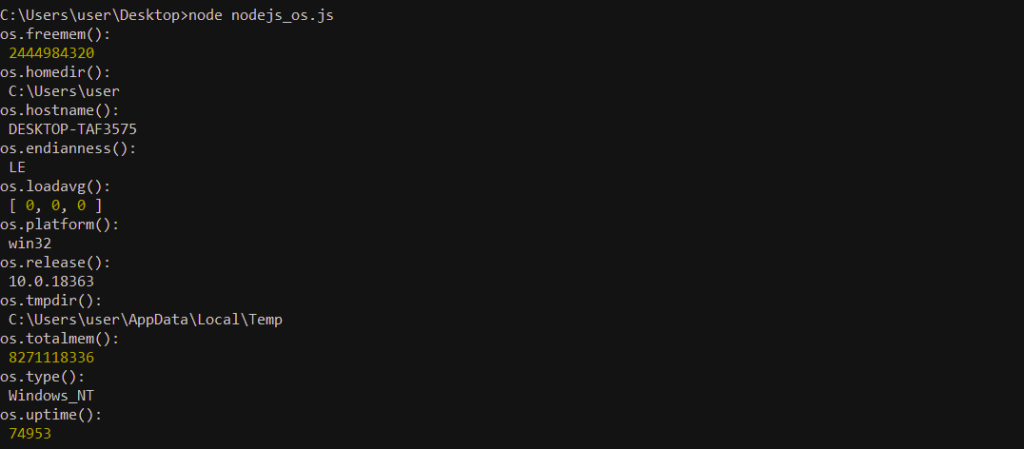
Save the below commands in the file nodejs_os.js and run it

const os=require('os');  
console.log("os.freemem(): \n",os.freemem());  
console.log("os.homedir(): \n",os.homedir());  
console.log("os.hostname(): \n",os.hostname());  
console.log("os.endianness(): \n",os.endianness());  
console.log("os.loadavg(): \n",os.loadavg());  
console.log("os.platform(): \n",os.platform());  
console.log("os.release(): \n",os.release());  
console.log("os.tmpdir(): \n",os.tmpdir());  
console.log("os.totalmem(): \n",os.totalmem());  
console.log("os.type(): \n",os.type());  
console.log("os.uptime(): \n",os.uptime()); 
node.js OS method example

Node.js os signal constants

Indicates commonly used operating system-specific constants for error codes, process signals. The below given are the node.js OS Signal constant exported by os.constants.signals

The below given are the node.js OS Signal constant

ConstantDescription
SIGHUPdepicts when a controlling terminal is closed or a parent process exits.
SIGINT depicts when the user interrupts a process – CTRL +C
SIGQUIT depicts when the user terminates a process and perform a core dump.
SIGILL informs process to notify that it has attempted to perform an illegal, malformed, unknown, or privileged instruction.
SIGTRAP informs process when an exception has occurred.
SIGABRTinforms process to request that it abort.
SIGIOTSynonym for SIGABRT
SIGBUS informs process to notify that it has caused a bus error.
SIGFPE informs process to notify that it has performed an illegal arithmetic operation.
SIGKILL informs process to terminate it immediately.
SIGUSR1, SIGUSR2 informs process to identify user-defined conditions.
SIGSEGV informs process to notify of a segmentation fault.
SIGPIPE informs process when it has attempted to write to a disconnected pipe.
SIGALRM informs process when a system timer elapses.
SIGTERM informs process to request termination.
SIGCHLD informs process when a child process terminates.
SIGSTKFIT informs process to indicate a stack fault on a coprocessor.
SIGCONTindicates the operating system to continue a paused process.
SIGSTOP indicates the operating system to halt a process.
SIGTSTPinforms process to request it to stop.
SIGBREAKindicates when the user interrupts a process.
SIGTTIN informs process when it reads from the TTY while in the background.
SIGTTOU informs process when it writes to the TTY while in the background.
SIGURG informs process when a socket has urgent data to read.
SIGXCPU informs process when it has exceeded its limit on CPU usage.
SIGXFSZ informs process when it grows a file larger than the maximum allowed.
SIGVTALRM informs process when a virtual timer has elapsed.
SIGPROF informs process when a system timer has elapsed.
SIGWINCH informs process when the controlling terminal has changed its size.
SIGIO informs process when I/O is available.
SIGPOLLSynonym for SIGIO
SIGLOST informs process when a file lock has been lost.
SIGPWR informs process to notify of a power failure.
SIGINFOSynonym for SIGPWR
SIGSYS informs process to notify of a bad argument.
SIGUNUSEDSynonym for SIGSYS

Node.js OS Priority Constants

The below given process scheduling constants are exported by os.constants.priority

Constant Description

PRIORITY_LOW

depicts the lowest  process scheduling priority. Uses IDLE _PRIORITY_CLASS for Windows. Other platforms – Value 10

PRIORITY_BELOW_NORMAL

indicates the process scheduling priority above PRIORITY_LOW and below PRIORITY_NORMAL.  Uses BELOW_NORMAL_PRIORITY_CLASS for Windows. Other platforms – Value 10

PRIORITY_NORMAL

The default process scheduling priority. Uses NORMAL_PRIORITY_CLASS for Windows. Other platforms – Value 0

PRIORITY_ABOVE_NORMAL

indicates the process scheduling priority above PRIORITY_NORMAL and below PRIORITY_HIGH. Uses ABOVE_NORMAL_PRIORITY_CLASS for Windows. Other platforms – Value -7

PRIORITY_HIGH

indicates the process scheduling priority above PRIORITY_ABOVE_NORMAL and below PRIORITY_HIGHEST. Uses HIGH_PRIORITY_CLASS for Windows. Other platforms – Value -14

PRIORITY_HIGHEST

The highest process scheduling priority. Uses RELATIVE_PRIORITY_CLASS for Windows. Other platforms – Value -20

References

node.js OS Reference Link


Node.js Tutorial – Domain Name System (DNS)

The Tutorial provides the detailing about the node.js DNS module which provides names resolution or look up IP addresses of the host names. The node.js DNS module does not always use the DNS Prootocl for lookup. In case of specific need to perform name resolution using network communications, it is suggested to invoke the method dns.lookup().

const dns = require('dns');
dns.lookup('oracleappshelp.com', (err, address, family) => {
  console.log('address: %j family: IPv%s', address, family);
});

If the given lookup name is Correct, then it will provide the IP Address , else it will throw the error as given below

C:\Users\user\Desktop>node dns.js
address: undefined family: IPvundefined

The other DNS methods /functions in the dns module connect to actual DNS Server to perform the DNS name resolution and uses the network to perform the DNS queries. These methods do not use the same set of configurations as dns.lookup()

Node.js dns.resolver class

The dns.resolver is the independent class for processing the DNS requests.

Creating a new resolver uses the default server settings. Setting the servers used for a resolver using resolver.setServers() does not affect other resolvers.

const { Resolver } = require('dns');
const dnsResolver = new Resolver();
dnsResolver.setServers(['12.32.45.65']);
// This request will use the server at 12.32.45.65, independent of global settings.
dnsResolver.resolve4('oracleappshelp.com', (err, addresses) => {
  // ...
});

Node.js dns methods

The below given are the available dns methods

dns method namedns method description
dns.getServers() Returns an array containing IP addresses related to the current server
dns.setServers(servers) Sets the IP addresses of the servers
dns.lookup(hostname[, options], callback) Looks up a hostname. A callback function contains information about the hostname, including it’s IP address
dns.lookupService(address, port, callback) Looks up a address and port. A callback function contains information about the address, such as the hostname
dns.resolve(hostname[, rrtype], callback) Returns an array of record types belonging to the specified hostname
dns.resolve4(hostname, callback) Looks up an IPv4 address. The callback function includes an array of IPv4 addresses
dns.resolve6(hostname, callback) Looks up an IPv6 address. The callback function includes an array of IPv6 addresses
dns.resolveCname(hostname, callback) Looks up CNAME records for the specified hostname. The callback function includes an array of available domains for the hostname
dns.resolveMx(hostname, callback) Looks up mail exchange records for the hostname
dns.resolveNs(hostname, callback) Looks up name server records for the hostname
dns.resolveSoa(hostname, callback) Looks up a start of authority record for the hostname
dns.resolveSrv(hostname, callback) Looks up service records for the hostname
dns.resolvePtr(hostname, callback) Looks up pointer records for the hostname
dns.resolveTxt(hostname, callback) Looks up text query records for the hostname
dns.reverse(ip, callback) Reverses an IP address into an array of hostnames
DNS methods in Node.js

Node.js tutorial – error handling examples

The tutorial provides the detailing on the node.js errors being occurred while processing the application request. Node.js error could be node.js assertion errors, asynchronous API error, error-first callback, user-specified errors, syntax error, Eval error and Range error.

Like any other scripting language , the node.js error are also classified into the below given categories:

  • Standard Java Script Error : the below give errors can be considered as the node.js standard javaScript errors.
Error Name Error Description
<EvalError>depicts the error regarding the global eval() function
<syntaxError> depicts the error regrading the invalid syntax or code
<RangeError>depicts the error when the value is not set in the allow range value
<ReferenceError>depicts the error when a non-existent variable is referenced
<TypeError>depicts the error when the value is not of the expected type
<URIError>depicts the error when a global URI handling function returns processing error
Standard Java Script Error

Catch statement for Node.js SyntaxError

try {
  eval('evaluate something...');
} catch (e) {
  console.error(e instanceof SyntaxError); 
  console.error(e.message);                
  console.error(e.name);                   
  console.error(e.fileName);               
  console.error(e.lineNumber);             
  console.error(e.columnNumber);           
  console.error(e.stack);                  
}

Throw New Exception for EvalError

try {
  throw new EvalError('This is an EvalError Example', 'evalErrorFile.js', 21);
} catch (evalErrorException) {
  console.log(evalErrorException instanceof EvalError); // true
  console.log(evalErrorException.message);              // "This is an EvalError Example"
  console.log(evalErrorException.name);                 // "EvalError"
  console.log(evalErrorException.fileName);             // "evalErrorFile.js"
  console.log(evalErrorException.lineNumber);           // 21
}

Catch Statement for Node.js RangeError

function Validate(value)
{
    if(["Blue", "Red", "Grey"].includes(value) === false)
    {
        throw new RangeError('The user has entered the wrong vlaue:' + value)
    }
}
try
{
    check("Orange")
}
catch(error)
{
    if(error instanceof RangeError)
    {
        // code for range error handling
    }
}
  • System Error: The System error could occur when the node.js program / function performs the file open operation where the file does not exist or trying to send request data through the socket which is closed , then the node.js throws the system error
  • Assertion Error: These types of error are initiated by Node.js when defects an logic violation which is not expected due to processing the request. The node.js assert module raises the error.
  • User-specified Error: These types of errors are custom error written in the application code.

Error-first callbacks

The node.js asynchronous API methods follows the common pattern referred as “error-first-callback”. The error-first-callback pattern , a callback function is passed to the method as an argument. In case of error, the callback function is called with the Error Object as the first argument. In case of No Error, the first argument is passed as Null.

// Consider the example where customer file does not exist
const fs = require('fs');
function errorFirstCallback(err, data) {
  if (err) {
    console.error('Error Occured while processing the file data', err);
    return;
  }
  console.log(data);
}
fs.readFile('/directory/filefolder/customerFile', errorFirstCallback);

try catch failure for Asynchronous API methods

The node.js asynchronous API methods generated errors cannot be captured using the try…catch mechanism

const fs = require('fs');
try {
  fs.readFile('/directory/filefolder/customerFile', (err, data) => {
    if (err) {
      throw err;
    }
  });
} catch (err) {
  // This erorr block will not be processed for Asynchronous API methods
  console.error(err);
}

Buffer class in Node.js

The node.js performs the streams and file system operations for interacting with operating system or other run time processed and uses buffer objects to represent the binary data in the form of a sequence of bytes.

The node.js buffers is the sub-class of  Uint8Array  which in built on the JavaScript language and provides numerous methods. The node.js APIs accepts  plain Uint8Array whenever the buffer instances are created and are similar to arrays of integers from 0 to 255

The node.js buffer size allocation is provided at the creation of the instance and has fixed-size blocks of memory which cannot be changed.

node.js buffer examples

// creates zero-filled Buffer of length 10.
const zeroFilledBuffer = Buffer.alloc(10);

// Creates a Buffer containing the bytes [4,5,6].
const containsBytes = Buffer.from([4, 5,6]);


Global & Module Scope Objects in Node.js

The Tutorial provides the detailing about node.js global objects and the listing of node.js global objects and its usage. There are some objects which are considered to be global objects but actually they have scope within the module only. Let’s discuss in detail.

Node.js Global Objects

The below given is the list of node.js global objects which are available in all modules by default and does not need to include specifically in the application.

  • console
  • process
  • buffer
  • setInterval(callback, delay[, arg][, …])
  • setTimeout(callback, delay[, arg][, …])
  • clearImmediate(immediateObject)
  • clearInterval(intervalObject)
  • clearTimeout(timeoutObject)

Node.js objects with module scope

The below given is the list of node.js objects which has module level scope

  • __dirname
  • __filename
  • exports
  • module
  • require()

Node.js console class

The node.js console class can be read at the below given link

Node.js console Tutorial 

Node.js Buffer class

The node.js buffer class can be read at the below given link

Node.js Tutorial – Buffer Class

Node.js _dirname

The node.js _dirname is of type “string” and depicts the directory name of the current module.

The execution of node.js _dirname is similar to the execution of path.dirname of the _filename.

Example: Insert the below command and save the file as global_dirname.js

console.log(__dirname);

Node.js Global Object – _dirname example

Node.js _filename

The node.js _filename is of type “string” and returns the file name of the current module.

Node.js exports

The node.js exports is of type “object” and is available within a module’s file-level scope. Before the module is evaluated , the exports variable is assigned the value of module.exports.

The module.exports object is created by the Module system, In case it is required the module to be an instance of the class, then assignment of the object to the module.exports , rebinds the local export variable.

const alphaModule = require('./alphaModule');
alphaModule.on('ready', () => {
  console.log('module "alphaModule" is ready');
});

Assignment to module.exports cannot be done in callbacks and thus to be done immediately.

Example: late callback which does not work

const callbackObj = require('./callbackObj');
console.log(callbackObj.x);

Node.js module.id

The module.id depicts the identifier for the module. module.id is of type “string”

Node.js module.loaded

The node.js module loaded depicts if the module is done loading or in the process of loading. module loaded is of type “boolean”

Node.js module.parent

This is the first module to be required . The module.parent is of type “module”

Node.js module.path

The module.path depicts the search paths for the module

Node.js module.require(id)

The node.js module.require(id) allows to load the required module for which the reference of the module object is required. The require() returns module.exports object and the scope of the module is within the module code, thus module needs to be explicitly exported to be in use.

module.require(id) requires:

id : <string>

Returns: <exported module object>