The tutorial provides the node.js integration with MySQL to delete record from the mysql table. The tutorial provides the steps on how to delete record from mysql database table using node.js application .
Delete Record from MySQL Table using node.js
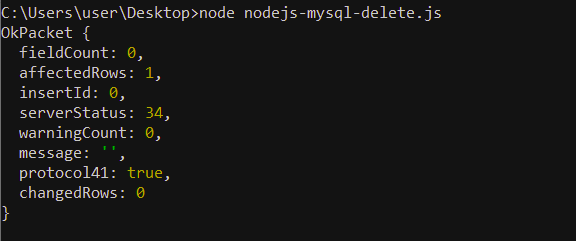
The MySQL uses ‘DELETE FROM’ statement for deleting records into mysql table. Ensure that you have the mysql table with ecords before proceeding with the record deletion process.
var mysql = require('mysql');
var con = mysql.createConnection({
  host: "localhost",
  user: "root",
  password: ""  ,
  database: "oracleappshelpDB"
});
con.connect(function(err) {
  if (err) throw err;
  con.query("DELETE FROM oracleappshelpusers WHERE firstName = 'Amit'",  function (err, result) {
    if (err) throw err;
    console.log(result);
  });
})
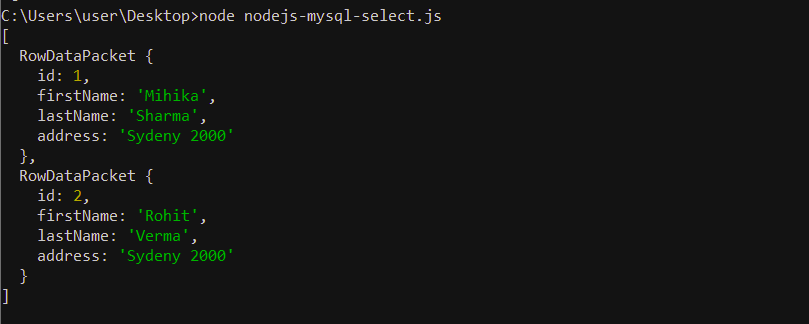
Execute the SELECT SQL node.js program and it will show the remaining records now.
The tutorial provides the node.js integration with MySQL to insert records into the mysql database. The tutorial provides the steps on how to insert new record into mysql table using node.js application .
Update Record into MySQL Table using node.js
The MySQL uses ‘UPDATE ‘ statement for updating records into mysql table. Ensure that you have the mysql table with records before proceeding with the table record updation process.
var mysql = require('mysql');
var con = mysql.createConnection({
host: "localhost",
user: "root",
password: "" ,
database: "oracleappshelpDB"
});
con.connect(function(err) {
if (err) throw err;
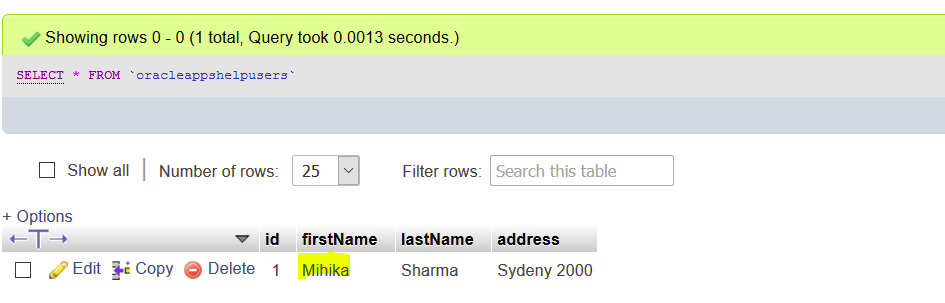
var sql = "UPDATE oracleappshelpusers SET firstName = 'Mihika' WHERE firstName = 'Mohit'";
con.query(sql, function (err, result) {
if (err) throw err;
console.log(result.affectedRows + " record(s) updated");
});
});
The tutorial provides the node.js integration with MySQL to insert records into the mysql database. The tutorial provides the steps on how to insert new record into mysql table using node.js application .
Insert Record into MySQL Table using node.js
The MySQL uses ‘INSERT INTO ‘ statement for inserting records into mysql table. Ensure that you have the mysql table created before proceeding with the table record insertion process.
var mysql = require('mysql');
var con = mysql.createConnection({
host: "localhost",
user: "root",
password: "" ,
database: "oracleappshelpDB"
});
con.connect(function(err) {
if (err) throw err;
console.log("MySQL Database oracleappshelpDB is Connected successfully!");
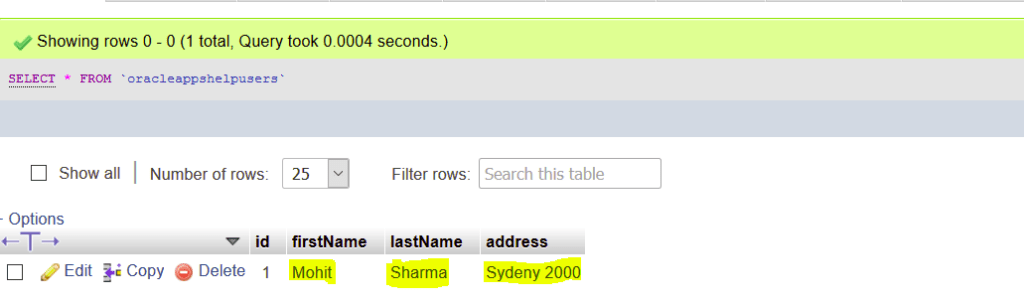
var sql = "INSERT INTO oracleappshelpusers (firstName, lastName,address) VALUES ('Mohit', 'Sharma', 'Sydeny 2000')";
con.query(sql, function (err, result) {
if (err) throw err;
console.log(" Record isnerted inot the table oracleappshelpUsers successfully...");
});
});
The tutorial provides the node.js integration to drop the mysql database tables. The tutorial provides the steps on how to drop tables in mysql database using node.js application .
Drop MySQL Table using node.js
The MySQL uses ‘DROP TABLE’ statement for dropping the tables in mySQL database. Ensure that you have the mysql table created for which drop table command is to be executed using the node.js application.
var mysql = require('mysql');
var con = mysql.createConnection({
  host: "localhost",
  user: "root",
  password: ""  ,
  database: "oracleappshelpDB"
});
con.connect(function(err) {
  if (err) throw err;
  console.log("MySQL Database oracleappshelpDB is Connected successfully!");
  var sql = "DROP TABLE oracleappshelpUsers";
  con.query(sql, function (err, result) {
    if (err) throw err;
    console.log("Table oracleappshelpUsers is Dropped successfully from  the Database - oracleappshelpDB");
  });
});
The tutorial provides the node.js integration to create the mysql Database Tables. The tutorial provides the steps on how to create tables in mysql database using node.js application .
Create Table into mysql using node.js
The MySQL uses ‘CREATE TABLE’ statement for creating tables in mySQL. Ensure that you have the mysql database created before proceeding with the table creation process.
var mysql = require('mysql');
var con = mysql.createConnection({
  host: "localhost",
  user: "root",
  password: ""  ,
  database: "oracleappshelpDB"
});
con.connect(function(err) {
  if (err) throw err;
  console.log("MySQL Database oracleappshelpDB is Connected successfully!");
  var sql = "CREATE TABLE oracleappshelpUsers (firstName VARCHAR(255), lastName VARCHAR(255), address VARCHAR(255))";
  con.query(sql, function (err, result) {
    if (err) throw err;
    console.log("Table oracleappshelpUsers is created successfully in the Database - oracleappshelpDB");
  });
});
Mysql create Primary Key
Lets modify the node.js program to include the Primary Key creation and SELECT Statement also for the table -oracleappshelpUsers.
var mysql = require('mysql');
var con = mysql.createConnection({
  host: "localhost",
  user: "root",
  password: ""  ,
  database: "oracleappshelpDB"
});
con.connect(function(err) {
  if (err) throw err;
  console.log("MySQL Database oracleappshelpDB is Connected successfully!");
  var sql = "CREATE TABLE oracleappshelpUsers (id INT AUTO_INCREMENT PRIMARY KEY, firstName VARCHAR(255), lastName VARCHAR(255), address VARCHAR(255))";
  con.query(sql, function (err, result) {
    if (err) throw err;
    console.log("Table oracleappshelpUsers is created successfully in the Database - oracleappshelpDB");
  });
var sql2 = "SELECT * FROM `oracleappshelpusers` ";
  con.query(sql2, function (err, result) {
    if (err) throw err;
    console.log(" SELECT Statement on the table oracleappshelpUsers is executed successfully");
  });

});
The tutorial provides the node.js integration with MySQL Database operations. The tutorial provides the steps to create the MySQL Database using node.js application
Node.js MySQL Create Database
MySQL uses CREATE DATABASE statement . Let’s see the below node.js program on creating the database in MySQL Database. Save the below program as nodejs-mysql-create-db.js
var mysql = require('mysql');
var con = mysql.createConnection({
  host: "localhost",
  user: "root",
  password: ""
});
con.connect(function(err) {
  if (err) throw err;
  console.log("MySQL Database Server is Connected successfully!");
  con.query("CREATE DATABASE oracleappshelpDB", function (err, result) {
    if (err) throw err;
    console.log("Database oracleappshelpDB is created successfully");
  });
});
C:\Users\user\Desktop>node node.js-mysql-create-db.js
MySQL Database Server is connected successfully!
Database oracleappshelpDB is created successfully
As we have mySQL installed on the computer and have the required ‘mysql’ module installed in the node server, let’s see the simple node.js program to connect the mySQL Database Server
var mysql = require('mysql');
var con = mysql.createConnection({
  host: "localhost",
  user: "root",
  password: ""
});
con.connect(function(err) {
  if (err) throw err;
  console.log("MySQL Database Server is connected successfully!");
});
C:\Users\user\Desktop>node nodejs-mysql-db.js
MySQL Database Server is connected successfully!
The tutorial provides the details on the node.js punnycode module. The node.js punnycode module provides the character encoding scheme as per the guidelines defined by RFC 3492 . The puunycode module converts the unicode string (UTF8) to ASCII string of characters for use in Internationalized Domain Names (IDN). The need of conversion is required as most browsers support ASCII string of characters whereas IDN names are non-ASCII and thus required conversion.
The Internationalized Domain Name, ‘例.com’ (equivalent to ‘example.com’) is represented by Punycode as the ASCII string ‘xn--fsq.com’. The node.js string decoder module can be accessed using the command
const punycode = require('punycode');
Node.js puunycode methods in node.js
The below given are the available methods in punnycode API
punnycode method name
punnycode method description
punycode.decode(string)
converts string of ASCII symbols to string of Unicode symbol
punycode.encode(string)
converts string of Unicode symbol to string of ASCII symbols
punycode.toASCII(domain)
convert a Unicode string of the domain name to Punnycode string of ASCII symbols
punycode.toUnicode(domain)
convert string of ASCII symbols of the domain name to Unicode String symbols ( non-ASCII)
The tutorial provides the details on the node.js string decoder module. The node.js string decoder module provides the API for decoding the buffer objects into the string with the support for multi-byte UTF-8 and UTF-16 characters. The String Decoder instance is validated that decoded string should not contain incomplete multi byte characters when the buffer instance is defined /written as the String Decoder instance, The node.js string decoder module can be accessed using the command
The below given are the available methods in the string decoder API
String Decoder Method
String Decoder Method Description
new StringDecoder([encoding])
uses the encoding UTF-8 for the decoded string encoding – <string>
stringDecoder.end([buffer])
The buffer ( buffer or typedArray orDataView) decoded string checks for the incomplete UTF-8 and UTF-16 characters to be replaced with substitution characters for the character encoding buffer – <buffer> – contains byte to decode return -<string>
stringDecoder.write(buffer)
The buffer ( buffer or typedArray orDataView) decoded string checks for the incomplete UTF-8 and UTF-16 characters to be omitted for the character encoding buffer – <buffer> – contains byte to decode return -<string>
The tutorial provides the details on the node.js query string usage. The node.js query string provides different methods for the string manipulation. The node.js Query String allows to convert the string to JSON Object and JSON Object and be converted to Query String . The node.js Query String can be accessed using the command
const querystring = require('querystring');
Node.js Query String Methods
The below given are the available methods using Query String in node.js
Query String Method Name
Query String Method Description
querystring.decode()
alias function for querystring.parse()
querystring.encode()
alias function for querystring.stringify()
querystring.escape(str)
performs URL percent-encoding on the given string to proivde optimized URL query strings str – <string>
querystring.unescape(str)
performs decoding of URL percent-encoded characters on the given str- <string>
querystring.parse(str[, sep][, eq][, options])
parses a URL query string (str) into a collection of key and value pairs str – <string> – URL query string sep -<string> – substring used to delimit key and value pairs in the query string. Default: ‘&’. eq – <string> – substring used to delimit keys and values in the query string. Default: ‘=’. options – <object> where decodeURIComponent – performs decoding percent-encoded characters in the query string. Default: querystring.unescape(). maxKeys – indicates maximum number of keys to parse. Specify 0 to remove key counting limitations. Default: 1000
provides URL query string from the object by iterating the object’s properties obj – – serialized URL query string sep – – substring used to delimit key and value pairs in the query string. Default: ‘&’. eq – – substring used to delimit keys and values in the query string. Default: ‘=’. options – where encodeURIComponent – performs when converting URL-unsafe characters to percent-encoding in the query string. Default: querystring.escape()
The tutorial provides the details on the node.js path module. The node.js path module provides the utilization for working with the file path and directory path. The node.js path module can be accessed using the command
const path = require('path');
There will be path variation when node.js is running on different operating system. To achieve same path execution output path.win32 should be used.
Node.js Path methods
Path Method
Path Method Description
path.basename(path[, ext])
execution behaviour is similar to unix base command where it returns the last portion of the path path – <string> ext – <string> file extension (optional) returns – <string> path.basename(‘/tmp/nodejs/path/pathbasename.html’); // Returns: ‘pathbasename.html’
path.delimiter
uses the type as <string> and provides different path specific delimiter ; for windows : for POSIX console.log(process.env.PATH); // Returns: ‘/usr/bin:/bin:/usr/sbin:/sbin:/usr/local/bin’ console.log(process.env.PATH); // Returns: ‘C:\Windows\system32;C:\Windows;C:\Program Files\node\’
path.dirname(path)
execution behaviour is similar to unix base command where it returns the directory name of the path path – <string> returns – <string> path.dirname(‘/tmp/nodejs/path/pathdir.html’); // Returns: ‘/tmp/nodejs/path’
path.extname(path)
execution behaviour is similar to unix base command where it returns the extension of the path path – <string> returns – <string> path.dirname(‘/tmp/nodejs/path/pathdir.html’); // Returns: ‘.html’
path.isabsolute(path)
indicates if path is an absolute path. path – <string> return – boolean path.isAbsolute(‘//nodeServer’); // true path.isAbsolute(‘node/path’); // false path.isAbsolute(‘.’); // false
path.relative(from, to)
solves the relative path from “from” to “to” from <string> to <string> return <string> path.relative(‘/data/node/path/relative’, ‘/data/node/tmp/absolute’); // Returns: ‘../../tmp/absolute’
path.join([path1][, path2][, …])
join all path segments using delimiter and returns the normalized resulting path path – <string> –sequence of path segments returns – <string> — normalized resulting path path.join(‘/tmp’, ‘node’, ‘path/sample’, ‘..’); // Returns: ‘/tmp/node/path/sample’
path.normalize(p)
normalize a string path, taking care of ‘..’ and ‘.’ parts path – <string> returns – <string> path.normalize(‘C:\tmp\\node\path\..\’); // Returns: ‘C:\tmp\node\’
path.parse(pathstring)
returns the object from the path string path – <string> returns – <string> where return object could have dir <string> root <string> base <string> name <string> ext <string> On Windows: path.parse(‘C:\tmp\node\pathParsing.txt’); // Returns: // { root: ‘C:\’, // dir: ‘C:\temp\node’, // base: ‘pathParsing.txt’, // ext: ‘.txt’, // name: ‘file’ }
path.format(pathObject)
returns the path string from the object where pathObject could have dir <string> root <string> base <string> name <string> ext <string> pathObject.root is ignored if pathObject.dir is provided pathObject.ext and pathObject.name are ignored if pathObject.base exists On Windows: path.format({ dir: ‘C:\node\pathdir’, base: ‘pathexample.txt’ }); // Returns: ‘C:\node\pathdir\pathexample.txt’
The tutorial provides the detail on the node.js TTY module. The node.js TTY module provides the capability to run the node.js with a Text Terminal (TTY) attached. The node.js tty module provides the tty.ReadStream and tty.WriteStream classes. The node.js tty module can be accessed using the below command
const tty = require('tty');
The node.js peforms the below activities when it is being run as a TTY context:
process.stdin to be initialized as an instance of tty.ReadStream
process.stdout and process.stderr to be the instances of tty.WriteStream
Validate if Node.js is running as TTY context
The below command can be used to identify if the node.js is being run as TTY context
var tty = require('tty');
process.stdin.setRawMode(true);
process.stdin.resume();
 console.log('This is sample text to show TTY module usage...');
process.stdin.on('keypress', function(char, key) {
  if (key && key.ctrl && key.name == 'c') {

    process.exit()
  }
});
C:\Users\user\Desktop >node nodejs-tty.js
This is sample text to show TTY module usage...
Class tty.ReadStream in node.js TTY module
The class tty.ReadStream in the TTY module is for reading the TTY Context and uses the process.stdin as the instance for the tty.ReadStream. The below given are the class methods for tty.ReadStream
tty.ReadStream Class Methods
tty.ReadStream Method Description
readStream.isRaw
returns TRUE if the TTY is configured to operate as a raw device
readStream.isTTY
always TRUE for tty.ReadStream instances
readStream.setRawMode(mode)
mode: TRUE if the tty.ReadStream is configured to operate as a raw device return: <this> which returns the read stream instance
Class tty.WriteStream in node.js TTY module
The class tty.WriteStream in the TTY module is for writing the TTY Context and uses the process.stdout and process.stderr as the instance for the tty.WriteStream.
Event: ‘resize’: The event resize is invoked when the writeStream.cloumns or writeStream.rows have changed but it does not return any arguments to the listener callback.